
1. Whats in the Package
The SocialAds Package comes with the following extensions
The SocialAds Core Extensions
- The SocialAds core component - com_socialads
- The Ads display module- mod_socialads
System Plugins
- The Tjassetsloader plugin - tjassetsloader (ver. 3.0 Onwards)
Payment Plugins
These enable you to allow you to have various payment methods for the Ads on your site
- Paypal Payment Plugin - payment_paypal
- Authorize.NET Payment Plugin - payment_authorizenet
- JomSocial Points Payment Plugin - payment_jomsocialpoints
- Alpha Points Payment Plugin (ver. 2.0 Onwards)
- Pay by Check Plugin (ver. 2.0 Onwards)
- Pay by PO plugin (ver. 2.0 Onwards)
- 2Checkout Payment plugin - payment_2checkout
- Ccavenue Payment plugin - payment_ccavenue
- Linkpoint Payment plugin - payment_linkpoint
- PayPalpro Payment plugin - payment_paypalpro
- PayU - Payment plugin - payment_payu
The Pay by Check & PO are offline payment methods that you need you to approve Ad Orders manually from the admin area.
Promote Plugins (Since ver 2.0)
These plugins allow you to let the Advertiser Advertise something he has on your site like a JomSocial Group, A SOBI listing, His own profile etc besides the ability to Promote a Web URL. They also suggest a possible ad based on what you select.
- Promote CB Profile - plug_promote_cb
- Promote JomSocial Profile - plug_promote_jsprofile
- Promote JomSocial Groups - plug_promote_jsgroups
- Promote JomSocial Events - plug_promote_jsevents
- Promote SOBI listing - plug_promote_sobi
- Promote EasySocial Profile - plug_promote_esprofile (ver. 3.0 Onwards)
Layout Plugins (Since ver 2.5)
These plugins add various Layout templates to SocialAds so that you can have more control on how an Ad is constructed. These plugins basically introduce template files to let you control how the Ad title, Description , Image are laid out with respect to each other. We shall soon release a few tutorials on how to create your own layout plugins. Currently SocialAds ships with 5 layout plugins which offer layouts as shown below . Layouts 1 & 3 are for Text & Image ads. Layouts 2 & 4 are for Text Only Ads.. While Layout 5 is a layout for Image ads.
 |
 |
 |
 |
| Layout 1 | Layout3 | Layout2 | Layout4 |
Targeting Plugins (Will be released in V2.6)
These are a new innovation we have added to SocialAds to open up the ability to extend SocialAd's targeting capabilities by writing targeting plugins. Thsi will greatly open up SocialAds to developers & make it easy to extend the targeting ability of SocialAds to add any conditions.
- XIPT Profile Type Targeting - This will allow you to target your Ads to Profile Types offered by JoomlaXi's Profile Type Extension
- Native JomSocial Profile Types Targeting
- JomSocial Group Targeting
- EasySocial Profile Targeting (ver. 3.0 Onwards)
SocialAds JMailAlerts Plugin (Will be released in V2.6)
This plugin will push Ads from SocialAds into JMailAlerts emails.
2. Installation
From version 2.5 onwards we are providing a single installer package that you can install using the Joomla Package Installer. By default we only enable the commonly needed extensions. Depending on what you are using, enable the needed plugins as noted below.
1. From the Payment gateways, we only enable the offline payment plugins ( Pay by Check & Pay by PO) by default. Enable & configure the ones that apply to you. Do not enable them till you have configured the relevant plugins.
3. From the Promote Plugins, enable the ones that apply. For instance Install the SOBI plugin only you have SOBI installed & want to let user's promote the listings they own.
4. Disable the Layout plugins you do not need.
5. Enable the SocialAds for J!MailAlerts plugin if you need your site Ads to appear in JMailAlerts mails.
(ver 2.7 onwards) There will be a link "Complete Geo Targeting Installation" displayed on installation, which will create & populate the tables needed for Geo Targeting
For instructions on how to Configure the extension, please read the Configuration Document.
3. Upgrading from Older version of SocialAds to 2.5 ( Important)
- On a safer side, ALWAYS do backup your site and database before upgrade
- Make sure you backup any customizations / langauges files that you have added/changed.
When you upgrade from older versions to 2.5 , make sure that you Open the Module & save it again. This is to make sure that the "Default" Zone which is there for backward compatibility with older versions of SocialAds is assigned to it. Unless you do this, your Ads will not show.
(ver 2.6 onwards) There will be a link "Click Here to Clean unused images" displayed on installation, which let you clean up all the unused images in SocialAds.
Configuration Settings:
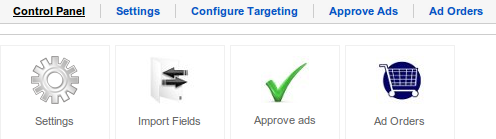
To configure the component, first of all you need to setup some basic settings in the component. In the control panel, or from the menu, click on "Settings"
In the Settings area, you can configure the following important attributes :
a. Price per click & price per impression : This is where you control the pricing for running the ads on your site. This is the price advertisers will need to pay when they post ads on your site.
b. Minimum Charge : This is the minimum value of advertising that an advertiser needs to buy at any sale.
c. Low Balance Threshold : This is the value at which a balance running low mail is sent to the advertiser.
d. Time interval between clicks & time interval between impressions : Set these values in seconds. These are to avoid fraudulent clicks or impressions .
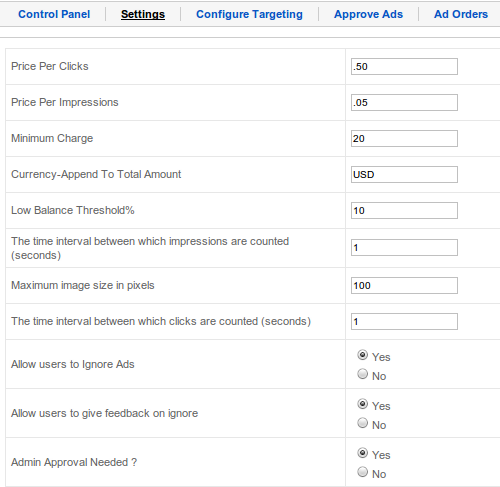
e. Max Image Size : Depending on where you show your ads, set this size for the image of the ad to be resized to.
f. Allow users to Ignore Ads : This will allow a user to stop a particular ad from showing for them.
g. Allow users to give feedback : On ignore, the users are asked feedback as to why they ignored the ad.
h. Admin approval : Set this to yes if you want to approve ads before they go live.
3. Configure Targeting
A. The Basics
This is an extremely critical part of the configuration & will play a large role in making targeting easy for end users. The admin has to chose only those fields that are most likely to be useful for targeting . Any other fields like Phone Numbers , Website etc should be set as "Don't Target".
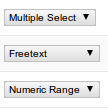
You have the option to set any field in JomSocial as a respective targeting field for Social Ads. There is variety of field types that you can map a JomSocial field as in JomSocial. Fields can be targeted as Free Text, Multiple Select, Single Select, Numeric Range & Date Range.
We have added some basic validation here to make your Job Easier.. For instance only Single & Multiselect fields in JomSocial can be mapped as Single or Multi Select fields for targeting.
Similarly, only date fields can be set as a date range in SocialAds.
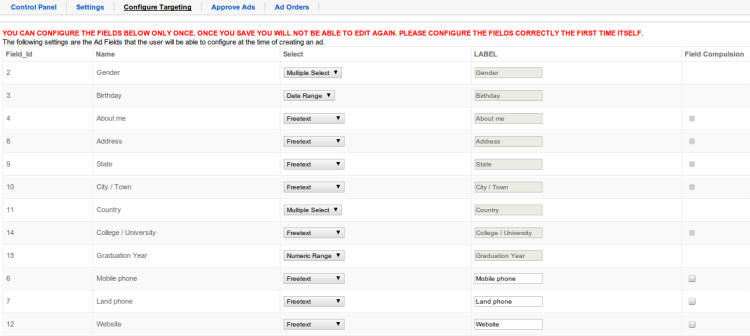
Some tips for you to setup the mapping correctly are given below.
- Make sure you select fields , most likely to be relevant to your advertisers.
- Set Don't Map to fields like telephone, Website etc which cant be used for targeting.
- Make sure you select minimum possible number of fields. The lesser the fields , the easier it is for your advertisers.
- We have designed the system for maximum flexibility to be able to work with any JomSocial field you add. So you cant have Age matching against a Birthday.. But you can set a Birthday range which effectively gives you age matching.
- Make sure you have fields like Interests that can be used by users for targeting.
B. Advanced
You will see that for free text fields, there is check box available to make a field compulsory. This is basically a experimental feature for fields like City, State which might not be select fields. If you set this to yes, then ads will only show if the value in this field matches exactly. This field is also compulsory for the advertiser to fill up when he targets an ad. We shall be following up with some video tutorials to make this more clear.
You can only setup this screen once. Once you save it , it cant be reset again. So make sure you give it good thought. If you add new JS fields later only those new fields can be configured.
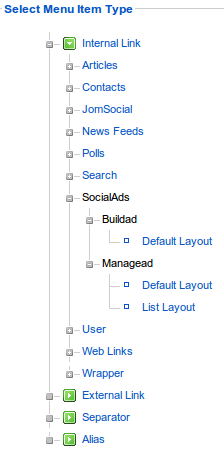
4. Create Menus
You need to create menus for creating an ad or managing an ad.
Go to Menus -> Mainmenu or any other menu where you want to create a menu item.
Then click on new, like the following screenshot, you will be able to create menus for Build Ad and Manage ad.
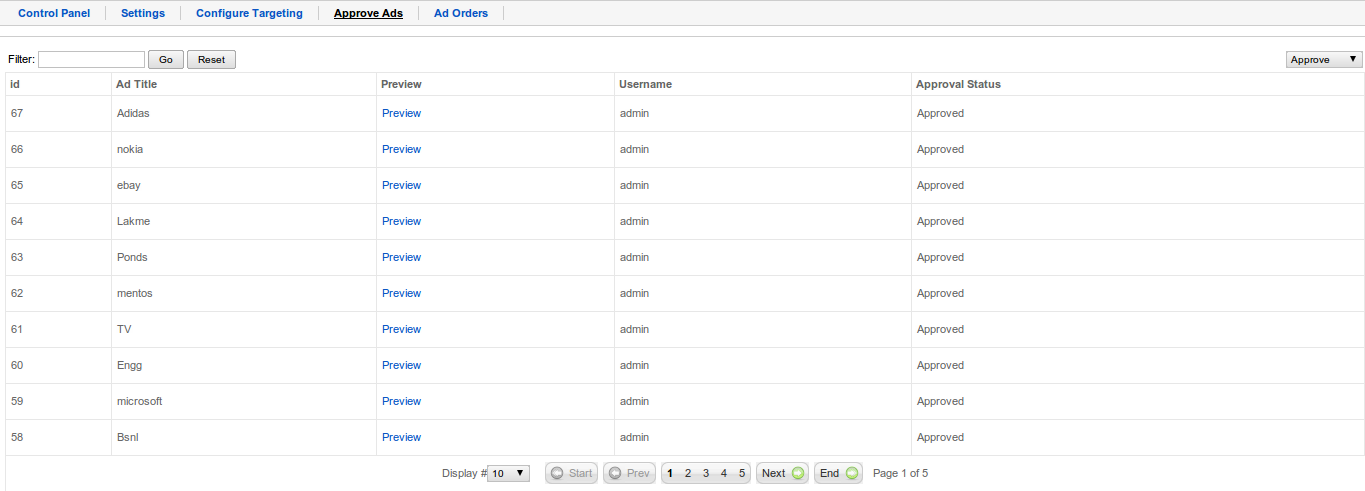
5.Approve Ads
You will be able to approve or reject the Ads based on the contents in the Ad.
You will be able to preview the Ad by clicking on the preview link. When a user creates a new ad, the ad should be shown as pending in this screen. The site administrator can then review the ad contents to approve or reject the ad.
If you reject the ad, then a dialogue box will come up where you can enter a message which will be sent to the user as the reason for rejection.
You can automatically approve ads from the settings configuration.
6. Ad Orders
In the ad orders screen, you can see the orders that have been placed against ad. You can filter these orders according to Pending, Confirmed & Refund.
If an order is pending, you can manually mark it as confirmed/refund.

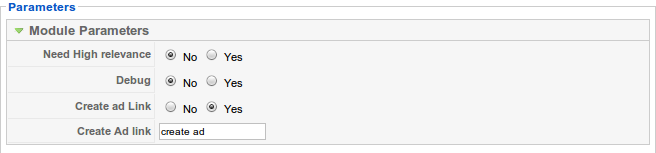
6. Module Parameters
Each published module will show only one ad. You can publish multiple copies of the module to show multiple ads.
Need high relevance(Experimental) : Switch this to 'yes' to increase Ad Relevance. Not recommended if you have very less number of ads compared to number of users.
Debug: Switch this to 'yes' to show relevance on front end for debugging purposes. Keep off for production sites.
Create ad link & text: This is shown below an ad to provide easy access to users to create ads.
7. Types of Ads
There are 3 types of ads:
Normal Targeted Ads: Any registered user should be able to create this ad from the Create ad page. These ads have targeted option and the ads are shown to their targeted audience except the person who has created the ad.
Unlimited Targeted Ads: Only Administrator can create these ads from the front end create ad view. Unlimited ads are normal targeted ads but they do not expire i.e. they have unlimited credits.
Alternative Ads: These ads are shown when no other ad is available for a particular user. We recommend you to create a few alternative ads on your site so that the module space is not left blank.
Next Step is to configure the payment plugins of your choice.