
Q. How we can adjust the pin layout on user end?
There is admin side setting available for this. Please go to Shika Dashboard, on right hand top corner you will get the 'Options', after clicking on it you will see all available basic configurations, click on 'General' to set the pin layouts..
Here we can specify pin width, padding between pins, characters to show on pin view
Q : Videos and images are not uploading to Amazon S3 server?
Please check first that the ‘Remote storage settings’ are set to work Amazon S3 server. Following are the steps to set this:
Check which ‘Storage methods’ you are using, if it is ‘local server’ then videos, images are not going to move to amazon server.
you have to select ‘Amazon server’ option
You have to specify the bucket name, secret key, access key, cron url, timespan to run the cron url, private key to execute the cron url
once you set all the parameters click on ‘Save’
Q : Activity stream is not displaying or getting random data for the same?
It depends on social integration used in your site.
For ‘Easysocial’ you have to make sure that ‘Course App’ should be published. Its located under ‘EasySocial’ -> ‘Applications’ -> ‘User — Course’
For ‘JomSocial’ you have to make sure that LMS App’ plugin should be published. Its located under ‘Extensions’ -> ‘plugins’ -> ‘LMS Courses APP’
Q : Nothing is happening when I try to add Start date to a course or Start date / End date to a lesson
The Calendar will work most of the times, But if it is not working for you try tweaking the settings from Techjoomla Assets Loader plugin of System type.
Q : Courses links are not working?
Please check the Search Engine Friendly URLs settings. Please go to "System" -> "Global Configuration" -> "site" option
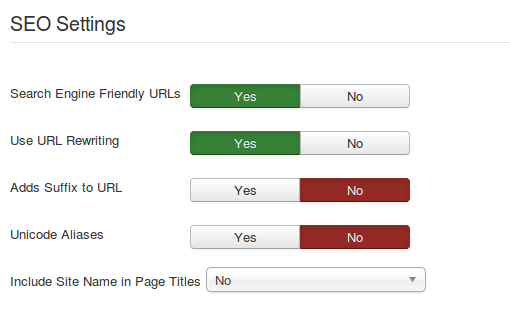
- Use URL Rewriting: Select to use a server's rewrite engine to catch URLs that meet specific conditions and rewrite them as directed. Available for IIS 7 and Apache.
- Apache users only!: Rename htaccess.txt to .htaccess before activating.
- IIS 7 users only!: Rename web.config.txt to web.config and install IIS URL Rewrite Module before activating.
- Search Engine Friendly URLs: Select whether or not the URLs are optimised for Search Engines.
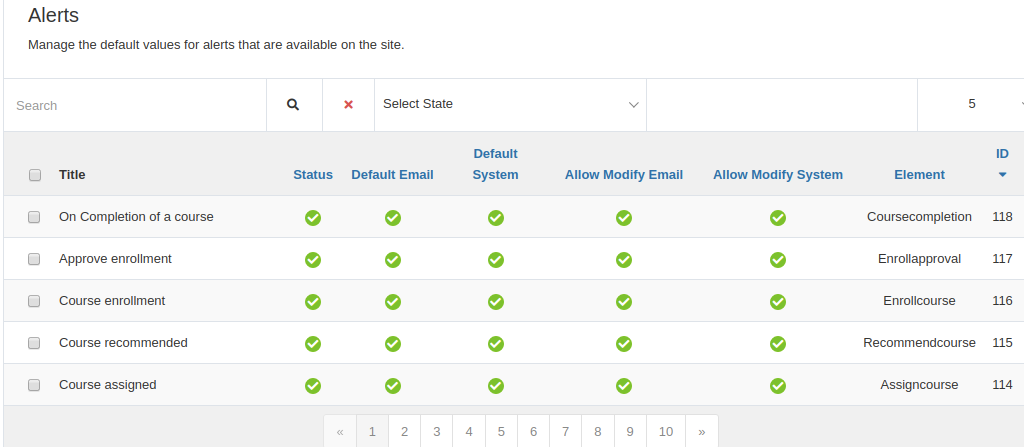
Q: How to enable Alerts in Easysocial?
To get a notification or alert in easy social, Go to Alerts in Easysocial, click on "Discover" to get LMS rules. You will get 5 alerts in ALERTS ES section, "Coursecompletion" , "Enrollapproval ", "Enrollcourse ", "Recommendcourse ", "Assigncourse"
Q: Does Shika support streaming of local files?
Preventing downloading of video is quite complicated, and needs a Digital Rights Management (DRM) software. However in most use cases it is sufficient to make it difficult for most users to download, and that can be achieved by using a streaming service. We will be implementing streaming support for uploaded files in Shika in a future release. This won’t be a change in jwplayer but rather a functional enhancement for Shika itself.
Q: Will you get an error while uploading large course content?
Increase the upload_max_filesize, post_max_size & memory limit variables in php.ini file. They should be set to a greater value than the course content package.
A:
1. Login as Administrator in the Admin side of the LMS
2. Go to "Courses" from the Left menu
3. Click on the name of the Course to which the image has to be uploaded
4. Go to the "Image" option by scrolling down to the bottom and click on "Choose file" button to select and upload an image
5. Click on "Save and Close" on top
Q. What should I know regarding usage of documents in my lessons?
A: The documents you upload in Shika are currently saved in box.com. If there are firewall restrictions where the LMS is being accessed, please note box.com and it's related URLs need to be whitelisted to access documents. The URLs to be whitelisted are:
* *.box.com
* *.box.net
* *.boxcdn.net
* *.boxcloud.com
* *.boxrelay.com
* c1-excel-15.cdn.office.net
* excel.officeapps.live.com
* fs.microsoft.com
* s1-excel-15.cdn.office.net
Q. Which report should I refer to in order to know the activities done by a user on a particular day?
A: You can refer to 'Activity Report'. To get this report, go to 'Reports' section and click the drop down and select 'Activity Report'
Q. I want to get report on each users' activity in all the lessons in a single course?
A: You can refer to 'Single Course Report'. To get this report, go to 'Reports' section and click the drop down and select 'Single Course Report'
Q. One of my learners completed a course but the reports still show the status as incomplete. The user even shared a screenshot showing that they completed the course.
A: This is mostly because of the grading type chosen when creating lessons in the course. If the lessons inside the course allow multiple attempts and the user has made several attempts of which the last attempt is incomplete, and the 'Attempts Grading' in the lesson is set to 'Highest Attempt', the LMS considers the learner's last attempt.
So, even if the learner has completed the lesson in his initial attempt but kept the lesson incomplete in the last attempt, the overall course status will show incomplete.
Solution:
Change the 'Attempt Grading' in the lesson from 'Highest Attempt' to 'Last Completed' attempt and click on the 'Tools' option (see image below) that appears above the lesson name to update the new settings to all the enrolled users.
Q. What are the things to remember when uploading Multiple Choice Questions in bulk using the csv format?
A: Please note: the following columns are Not mandatory when uploading fresh new questions to the platform:
Column A - id
Column B - Unique Id
Column F - Question Description
Column G - Ideal time
Column I - Marks Difficulty Level (use this column only if you need to mention the difficulty level of your question. Mention easy, medium or hard. If nothing is mentioned, the default labeling is medium)
Here’s an explanation of each mandatory column available in the csv format and how to enter information in each of the mandatory columns:
(Note: the csv format that is used for uploading questions in bulk is available in the 'Question Bank' section in the admin side. Hit the 'Import CSV' option and read the instruction to get the sample format file)
1. Column C (Grading Type) - The 'Grading type' column should have ‘quiz’ mentioned in lowercase (i.e., quiz)
2. Column D (Question type)- Should contain the type of question. Example: MCQ for Multiple Choice Questions
3. Column E (Question Title) and Column F (Question Description)- The actual question should be mentioned in the 'Question Title' column (Column E). Any description you would like to provide as additional information should be mentioned in the 'Question Description' column (Column F)
4. Column H (Category id)- Every question should be linked to a question category. For this, first you need to create a question category in the 'Question Category' section in the admin side. After you do that, you will see the category Id on the right side in the 'Question Category' section next to the category name under the 'ID' column. You need to mention this Id in Column H (Category Id) . Note: Do Not enter the category name. You need to enter the category Id
5. Column J (marks) - Enter the marks for the question in numbers
6. Column K (published) - Mention 1 in this column if you want the question to be published and made visible to the learners. Else mention 0
7. Column L onwards - You need to enter the choices to be given for the question. By default, the csv allows you to enter 2 choices for your Multiple Choice Questions. If you need to add a 3rd choice or more choices, simply copy the title
'answer3/rating(Answer/upper-range|marks for question|1(correct)/0(incorrect)|comments)' in a new column and enter your choices below that. Note: the number you see next to the word answer (in this example, it is answer3), refers to the serial number of your choice. So 3 here indicates that it is 3rd choice
All the options/choices you give for the question should have a column title as shown in the sample
Additional things to note:
1. If there are no comments to be given for a particular choice, there is no need to enter anything for the comments. Just mention the choice, marks for the choice and the no. to indicate whether or not the choice is correct (i.e., 1 or 0). Example: OptionA|1|1 (if the option is correct) OR OptionA|0|0 (if the option is incorrect)
2. Ensure that the choices you give for a question are not repeated
3. Always save the file with the questions in csv format and then import the file to the LMS
Q. What is Ideal Time in lessons?
A: Ideal Time is the minimum time or the right amount of time that is needed to understand the lesson as per the training administrator. The ideal time that was set for every lesson can be in the lesson report. This can then be compared with the actual time spent by each user (which too is available in the lesson report)
Q. Which report do I use to get details of all the payments I received for my paid courses (my sales report)?
A:
You can use 'Paid course report'. Steps to access:
1. Click on 'Reports' in the menu on the left side in the administrator side
2. Click on the dropdown and select Paid course report
Q. Is there a way to export reports to CSV?
A: Yes, there is. Go to the 'Reports' section, choose the report of your choice from the dropdown menu and hit 'CSV Export' option on top right above the dropdown menu.
Q. I want to associate a certificate with a course so that the learners get a certificate after completing the lessons in the course.
A:
You surely can do that. Follow these steps:
1. Go to 'Courses' menu under the 'Courses' section on the left side menu
2. Click on the desired course name
3. Scroll to the bottom, to the area where you see the option 'Certificate Term'
4. In the dropdown next to 'Certificate Term', select your certifying criteria (Complete all lessons or pass all lessons)
5. Then, refer to the area where you see 'Select Certificate', which is right below the 'Certificate Term' option. Here you can click on the dropdown and select the available certificates that you want to award your learners
Q. How to notify users when bulk enrolling users to a course?
A: When you hit 'Import CSV' option, in the 'Manage Enrollment' section, you will see a 'Notify User' option in the pop up box, which is located on the top left. There is a checkbox next to it that allows you to decide whether or not to notify users when bulk enrolling users using csv.
Q. I want to update data of my existing users. There are lots of users, how do I do that?
A: To bulk update data of multiple users at a time, follow these steps:
1. Go to 'Report' and choose 'User Report' from the dropdown and click 'CSV Export' option available on top so that the report starts downloading. This report is required so we get the ID of all the users in the platform
(Note: this ID we are referring to, is the LMS generated ID and not the username or any other Id. Also, before downloading the User Report, you can choose to keep only the ID, name, username and Email column in the report by clicking on the 'Hide / show columns' button. We would Not need any other columns for our purpose here)
2. Once you have the csv with the User Report containing the IDs of all the users, you can filter and choose the users whose data you would like to update.
(Note: If you already have a separate file with the list of users whose data needs to be updated, you can just compare the users in that file with the User Report file and keep only the relevant users from the User Report file)
3. Now you have the user list with their corresponding LMS IDs of only those users whose data needs to be uploaded
4. Go to 'Manage Enrollment' section and click 'Import CSV' and download the sample csv format file by following the instructions in the pop up box that appears.
5. Now, do the following in the sample csv format file you downloaded in step 4:
a.copy the IDs that you got in step 3 and paste it in the sample csv format file in Column B titled 'id'
b. Mention the word 'Id' in column A titled 'user_match_key' in every row that contains the user data
c. Mention the data to be updated in the relevant columns. For example: if you would like to update the email Id of a particular user, mention the new email Id of that user in the column titled 'email' in the same row where that user's Id is mentioned. If you would like to add the user to a new group, mention the group's Id in the column titled 'add_courses' in the same row where that user's Id is mentioned and so on...
d. save this file as csv
6. Now go to 'Manage Enrollment' section again and click on 'Import CSV' and then click on 'Choose file' to choose the csv file that you saved in step 5d.
7. Click 'Start Import' and you are done.
Q. One of the lessons in a course has a pre-requisite. The learner has fulfilled the pre-requisite but still the learner is not able to access the next lesson. What should I do?
A: This scenario arises due to the attempts limit and the attempts grading that is configured in the lesson. If the pre-requisite lesson allows multiple attempts and the 'Attempts Grading' option is set to 'Highest Attempt', the platform will always consider the status of the highest (or the last attempt).
Example: If a learner completed the pre-requsite lesson in their 1st attempt and took a 2nd attempt which remained incomplete, the platform will consider the status of the 2nd attempt (if the 'Attempts Grading' is set to 'Highest Attempt'). Since here, the learner's 2nd attempt is incomplete, the pre-requisite remains unfulfilled and hence, the next lesson will not open.
Solution:
1. You can change the Attempts grading to 'Last Completed Attempt' by which the platform will consider the attempt where the learner has last completed the lesson. Please refer to the image below.
2. After you change the attempts grading, you will need to apply this setting to all the enrolled users. For this, you need to click on the 'Tools' menu and hit proceed. Please refer to the image in the answer for question 12 which highlights the tools menu.
Q. I want to reduce the number of attempts of a lesson but I am not able to. What should I do?
A: If a lesson is already attempted by learners, the number of attempts in that lesson cannot be reduced below the actual number of attempts already made by the learners.
Example: If learners have already taken multiple attempts in a lesson and the highest attempt made in that lesson so far is say 10, you cannot now reduce the number of attempts limit to anything below 10.
Q. The learner did not hit the submit button on the quiz, they just started it and closed it so they can attempt later. However, this counted towards the learner's attempt. Why is that?
A: The moment a learner hits 'Start', it is counted towards the number of attempts allowed. This is to ensure fair practice and make sure every attempt is accounted for. Else, in case of serious assessments, questions can be viewed any number of times by opening and closing the quiz without the number of attempts getting affected and this can give way to scenarios where the questions are not answered genuinely.
Q. How do I associate a certificate to a course?
A:
Linking a certificate with a course is just 3 simple steps:
1. Search for the course under 'COURSES'
2. Scroll down and select the 'Certificate Term' (Complete all lesson or Pass all lesson)
3. Select the certificate to be used in the 'Select Certificate' filed and hit Save & Close
Q. How do I delete enrollment of a learner in a particular course from the admin side?
A: To delete enrollment of a learner in a particular course, follow these steps (also check the image below for more clarification):
1. Go to Manage Enrollment option
2. Search for the user using the Search box (you can search by name or email Id)
3. Select the course from which you want to delete the enrollment using the 'Select Course' box
4. Once the results appear, hit the check box next to the entries that you wish to delete
5. Hit the delete button (Please double check before deleting)
Q. How do I change the course creator of a certain course as the course creator shown currently is incorrect?
A: Please follow the below steps to change the course creator of a course:
1. Login to the admin side
2. Click on Courses
3. Search the course and click on the course name
4. Click on the user icon next to the 'Created By' section and choose the user who needs to be displayed as the creator
Q. Learners are not able to see the courses I created in the frontend. What should I do?
A: This could be due to couple of reasons. Please check the following:
1. Ensure the course is published. Go to Courses and search for the course in question and ensure there is no Red cross next to the course name. Red cross indicates the course is unpublished (meaning it won't be visible to the learners). If there is a Red cross, click on it and it will be published
2. Ensure the learner who is trying to access the course has permission to access the course. Follow the steps below to check this:
a. First check which group the user belongs to from the Users section (go to Users, search for the user, click on the name of the user, click on Assigned User Groups and see what all groups have check marks)
b. Go to User Access Levels menu and ensure the access level associated with this user's group matches with the access level given to the course. If not, you need to assign the required access level to this user's group. (For eg: Let's say the course access level is special, then the user group where the user belongs to should also be associated with the access level special)
3. Ensure you have a category assigned to the course. The course category should NOT say uncategorized
4. Ensure the course start date is not a future date.
Q. What image size do you recommend for course images (or the course thumbnails)?
A: Images with size 640px (w) x 460px (h) with it's main content in the center such that there is at least 10 pixels of space left on each side, would look good for the course images.
Q. What is the Consider for course marking and overall passing option that is available when creating a lesson inside a course?
A: This option is to decide whether or not to include the lesson in the course completion/passing criteria. If this is set to Yes, the learner will have to complete this lesson along with other required lessons in order for the course to be considered completed. If this is set to No, regardless of whether or not the user completes this lesson, the overall course will be considered completed as long as other required lessons are completed.
This option should be set to No, it these 2 scenarios mainly:
1. When you do not want a lesson to be included in the overall completion process
2. When the lesson is a Free Sample given to the learners in case of a paid course