
Note- You can no longer sign up for PayPal adaptive. It will work only if you have an existing approved app.
The Paypal Adaptive payments plugin allows you to make Split payments to the Vendors & Admin with the admin getting his or her fees & the Vendor getting their products sales. It basically automates the system completely without the admin having to manage payouts. Here's how you can set it up.
Paypal Adaptive payments needs you to setup a 'Paypal App' that the Paypal guys need to test & approve. In order to create this 'Live Paypal Application, you need to have your site setup with their Sandbox. So lets first see how you setup your site in Test or Sandbox mode.
A. Setup the Sandbox Testing Mode
- Enable & configure the Paypal Adaptive Payment plugin from plugin manager->Adaptive Payment plugin.
- In the Plugin tab, you need to enter the "Paypal Admin Email" Note that this should be a Pay Business Account. Make sure you setup a Business account in your paypal sandbox for this. To know how to use Paypal Sandbox & how to sign up & create accounts with it, please read our blog here.
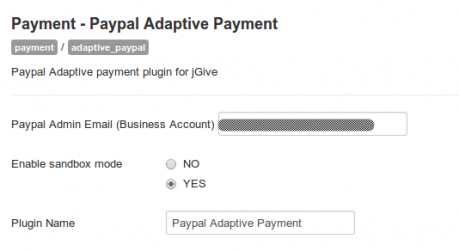
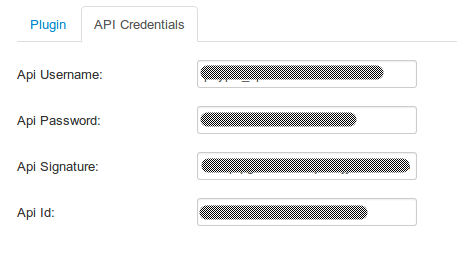
- Next you will need to get the API Username & API Password from your Paypal Business account. You can get this from your Paypal Sandbox. Login to the Sandbox site, go to Applications. Expand the Business account you are using for testing & click on the Profile link. This will open a modal popup which has a tab called API Credentials. Get the API username, API password & API Signature from there. Make sure you use these details from the same Business account that you configured in the Plugin tab.
- Setup the Sandbox test App ID : APP-80W284485P519543T . This is fixed for all sandbox applications.
B. Configure Quick2Cart
Go to the Quick2Cart Configuration section & configure it as below
- Set the Commission fee value (in percent)
- Select Payment Gateway(s)=> Adaptive Paypal.
C. Testing your setup in Sandbox mode
Setup the store with the PayPal Sandbox id for the store owner ie. vendor
To test the application, first create a new store & setup as you do regularly. When you setup the store, make sure you enter your Paypal Sandbox address for the store owner ie. vendor. This address can be a Personal or a business account. Now that the store is setup, logout. Make sure the account you use to make the payment has balance !
Buy the Products from the store as a Guest / Registered user
To actually purchase products, you will need another Paypal Sandbox account for you to act as a buyer. Make sure this is different from the Paypal Business ID & the vendor's paypal ids you have used till now. Proceed to regular checkout & pay on the Sandbox paypal site with this new testing account. If all went well, the order amount you paid should be split between the Admin & the vendor as configured by you in Quick2Cart settings. Note that the response from paypal to the site where you have setup Quick2Cart can be delayed. So it might take some time for the Payout to show up in the Payouts sections.
* Note Please test your setup on a live domain accessible to the internet & not on localhost. It will not work on localhost.
D. Create Your Live Paypal Application from your Regular Paypal account & Submit for approval
Now that you have everything working in sandbox mode, you need to create a 'Live' Paypal app & submit it for approval. This is needed for you to start accepting actual payments. We have blogged about this in detail. You can read the same here.
E. Configuring the Plugin for Live Use
You just need to change the following from Sandbox Credentials you did in Step A to live credentials
- In the Plugin tab, you need to enter the "Paypal Admin Email" Note that this should be a live Pay Business Account.
- The API Credentials for the live account need to be used here. Official documentation from Paypal for the same can be obtained here.
- Use the live App ID you obtained in step E to configure the App ID part.
Reference Links
- Official Paypal Documentation for taking your Application Live https://developer.paypal.com/webapps/developer/docs/classic/lifecycle/goingLive/
- Signing up for Live API Credentials https://developer.paypal.com/docs/classic/lifecycle/goingLive/#credentials.
- Our Blog on Best practices to getting your Paypal App approved fast http://techjoomla.com/general/best-practices-to-get-a-paypal-adaptive-payments-account-approved-fast.html
- Out Blog about using the Paypal Sandbox Site for testing Paypal Standard, Paypal Pro & Paypal Adaptive