
JAAS integration with Jticketing
Jitsi As A Service(JAAS) is a video-meeting platform that allows organizations and businesses to present their work/business in an online video meeting room. Jaas allows users to integrate Jitsi into their websites/apps and host an online meeting with different features like screen sharing, live streaming, and recording meeting.
JAAS allows you to customize your meeting windows by using branding. Branding provides you to add your own company logo or the company name to the jitsi meeting. Also one can customize the meeting UI background by using the branding’s “Customize the meetings UI background” feature.
Setup JAAS with Jticketing -
Jticketing has the facility to create online events. Jticketing is now integrated with Jaas to host events online. One can create an online event in Jticketing using JAAS as an Online Provider. Can track orders and attendees of that event. Check payouts and reports related to that event.
Note : To integrate JAAS with Jticketing, you should have a Jaas account or you can visit 8x8 Jitsi as a Service page and sign-up for a JaaS account.
Steps to setup JAAS with Jticketing :-
- Login to the Jaas website - 8x8 Jitsi as a Service
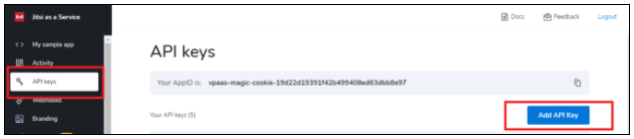
- First, you need to create an API key. For this, you need to go to the API keys from the menu situated on the left side of Jaas site. Click on “Add API Key” and any name to your API key.
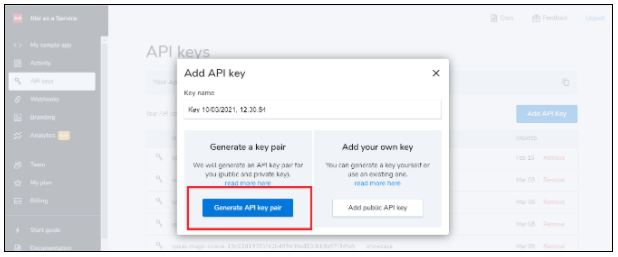
- There are two ways to add API key:
- Generate your own API key by adding your own public key. For this please refer guide to create API key
- And the other is to use the API key created by Jaas - Click on “Generate API Key”. Download both the Keys - Public key and Private key. This is necessary for further event processing.
- We will get a unique API key on following this process as shown below. These will be created whenever you add an API key.

- Also to get the recording of Jaas events, one needs to set up a webhook on his/her Jaas account.
- Go to the ‘Webhook’ from the left side menu in Jaas.
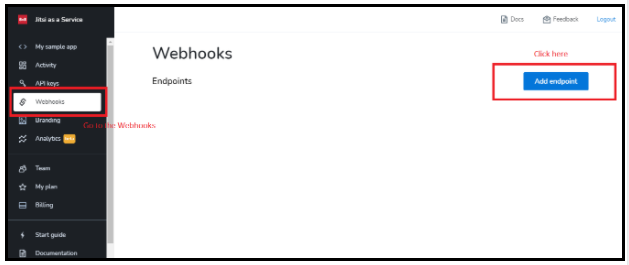
- Click on ‘Add Endpoint’.
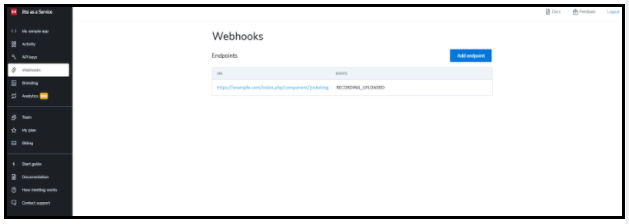
- When the popup window opens, add the ‘Endpoint Url’ in the format - “your website url” + “/index.php/component/jticketing/?task=jaas.recording”.
- For eg., if your website is “https://example.com” where you are hosting your event or where Jticketing is installed. So the ‘Endpoint Url’ will be “https://example.com/index.php/component/jticketing/?task=jaas.recording”
- You can add any description to the webhook endpoint
- Select the “Event sent to the endpoint Url” to “RECORDING_UPLOADED”. Then click on “Add endpoint”.
- Here the webhook is ready for recording.
- Note: It will be to get work when the endpoint website URL is secured (https). And proper configuration of the webhook is necessary to access the recording at the Jticketing end. It would look like this:
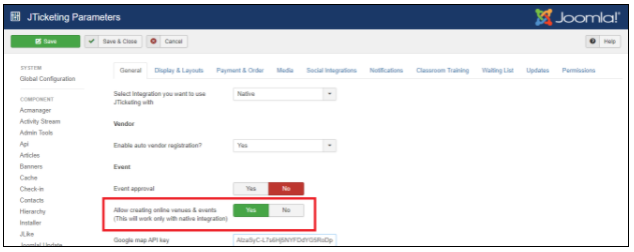
- Go to configurations of Jticketing on your site. Set the config ‘ to enable online events in Jticketing as shown in the image below and check that the Jaas plugin is enabled.
- Create a new venue. Enable the “Online Venue” option.
- Select “Jaas” from the online provider lists. Provide the required details -
- Select “Jaas” from the online provider lists. Provide the required details -
- API key - Add the API key that we have generated at Step 3.
- Public key - Add the public key that is present in the file downloaded in step 3. It begins with “-----BEGIN PUBLIC KEY-----” and ends with “-----END PUBLIC KEY-----”
- Private key - Add private key that is present in the file downloaded in step 3. It begins with “-----BEGIN PRIVATE KEY-----” and ends with “-----END PRIVATE KEY-----”
- Check for the functionality you need to provide to your online event in other options
- Save the Venue.
- Create a new Jticketing Event. Enable “Online Event” option.
- Select the Jaas Venue that you created from the venues list. Add other event details.
- Save the Event.
- Now users can book tickets from Front End for the above-created event and can attend it after completing their ticket orders.
- Event creators can attend the event without booking a ticket.
- When the event is over, the user can be able to view recordings if the configuration is done as shown in step 4 and recording was ON during the event.