
Installation and Upagration
Broadcast comes as a Quick install package containing the following extensions
- The Main Broadcast component
- Broadcast Module
- JomSocial Plugin ( type community)
- Techjoomla API plugins for Social Integration ( type techjoomlaAPI)
Important note:
We have removed settings view from broadcast 1.4 so while upgrading broadcast from 1.3.x to broadcast 1.4 you need to open broadcast component in backend and click on options button after select all your settings and click on save button.
Configuration
Setting up Broadcast involved 4 main Steps
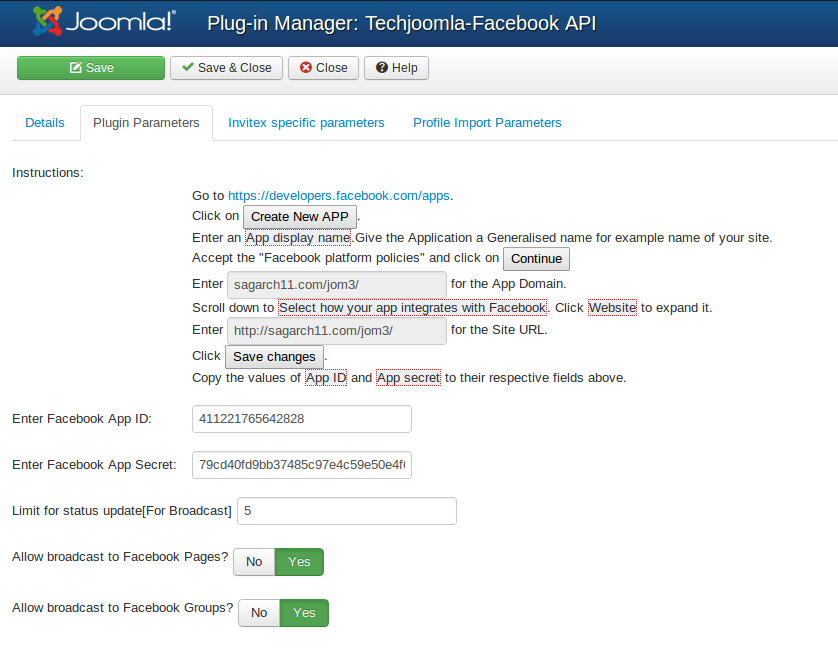
1. Setting up your Social Apps & Techjoomla API Plugins ( this is covered in a separate Article ) Please refer this
After creating API's Open Site Backend=>Extensions=>plugin Manager=>Select Type as TechjooomlaAPI=>open plugin(foreaxample facebook) and enter respective keys and save and publish plugin
----------------------------------------------------------------------------------------------------------------------------------------------------
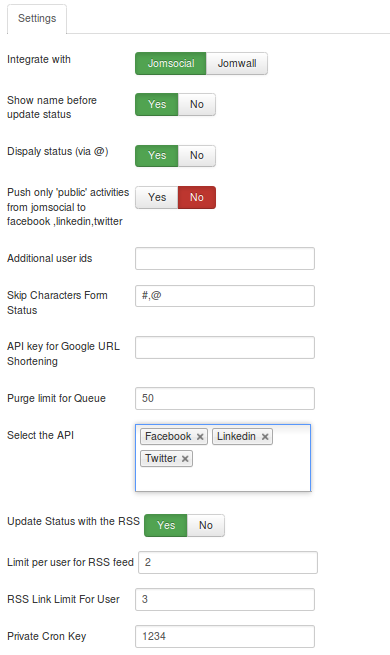
2. Configuring the Broadcast Settings
-----------------------------------------------------------------------------------------------------------------------------------------------------------------
3. Setting up the Cron Jobs
This is very important since its the cron job that pushes and pulls the messages to and from the Social Networks. So its a must to set this up or no messages will broadcast..
A. On Linux Based Server Environments
There are many ways in which you can setup a cron for example using Wget, Curl or Lynx. Here we show some common examples.
On most Linux server environments, you can simply run the command below as often as you are comfortable. We recommend that you run it every 30 minutes or less. On a busy site, you might want to run it every 10 minutes. The more frequently you run it, the less load it will be on the server at any single cron run.
lynx -source "CRON JOB URL" > /dev/null
lynx is a text based browser that is installed in most hosting environments. If you do not have lynx installed, you can use other alternatives such as wget as below,
wget -O /dev/null "CRON JOB URL" > /dev/null
Now here the CRON JOB URL will be the one from the backend Broadcast settings view. You just have to copy the cron url from there and replace it with the CRON JOB URL in the above formats
A Cron job can be setup using the command line in any of the ways above.
4) Menu setup
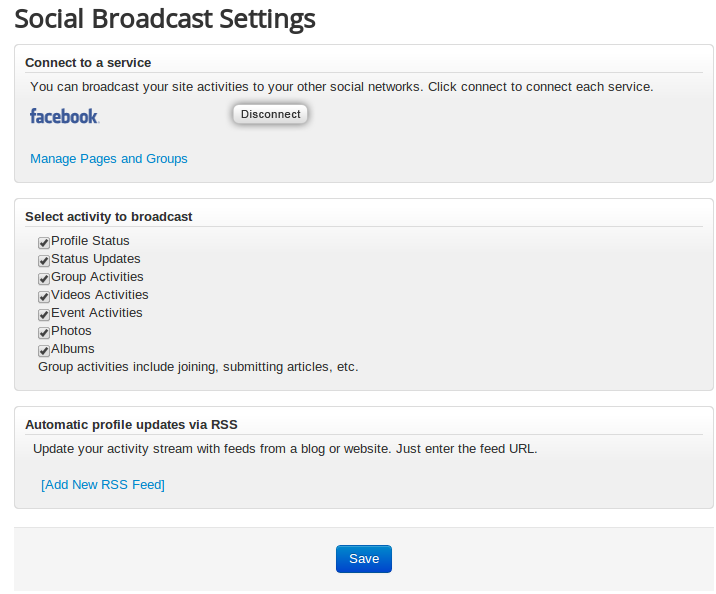
Create Menu for Broadcast Config in Menu manager in backend.
Each site User needs to select his own settings in this menu that was created before and connect to social APIS and check activities and save settings.
Further to put in this is brief explaination of how broadcast works?
Firstly, the user should set which activity needs to Boadcast from this view 'http://domain_name/index.php?option=com_broadcast&view=config'.
For example, if the user has set 'Profile Status' in the view then only the status updates from the JomSocial Activity stream will be pushed into the Broadcast queue.
Once you have updated your JomSocial activity stream like the JomSocial status...it gets pushed in the Broadcast queue (which you can see in the Boadcast backend). And when the cron job "http://domain_name/index.php?option=com_broadcast&controller=broadcast&task=set_status&tmpl=component&pkey=1234" runs then the status from the queue are pushed into the FB/Twitter/Linkendin walls according to what you have connected to.
Also when the cron job "http://domain_name/index.php?option=com_broadcast&controller=broadcast&task=get_status&tmpl=component&pkey=1234" runs the updates are pulled from FB/Twitter/Linkendin walls and pushed into the JomSocial activity stream
You can see the cron urls in the Broadcast backend settings view.
Please refer this doc "http://techjoomla.com/documentation-for-broadcast/installation-a-configuration.html" for setting up the cron jobs.