
Quick Setup - Basic Documentation
Note that the order in which we setup the extension is important. Recommended Order is as below .
- Once you have installed the Component & the User Plugin, first make sure that the User Plugin is enabled.
- Next install & enable & configure all J!MailAlerts Alert or content plugins. Don't set any of the plugins to 'Registered'
- Once done, go ahead & configure the component.
- Next Design the Email & add the Plugin tags that you want to be included in your Alerts. Note that only plugin tags that are included in the email are sent.
- Next save the default "Sync" settings for new users in the Sync Tab
- Once Done, Check override current settings & click on the Sync Button to migrate settings to all existing users.
Note that You should only Run the Sync after you have installed & configured the parameters of all J!MailAlerts Alert Plugins.
Detailed Documentation with Screenshots
A. Configure the Component
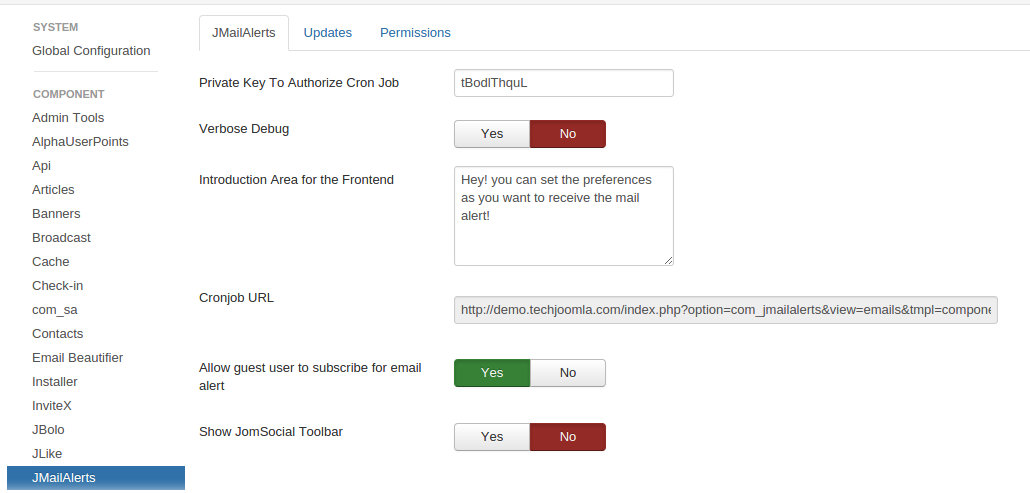
This view will allow you to set the basic settings for the extension.
- Private Key to authorize Cron Job to send mails : This is the string that is used to authenticate the cron job.This should be a secure key that acts like a password to prevent unauthorized running of the Cron Job URL.
- Verbose Debug : This setting shows detailed processing information while writing the log file or running the cron. Its very useful to see how the component works & how it is processing your emails. We recommend setting this to Yes.
- Introduction Area for the Frontend : Use this box to introduce the Alerts system to your users & tell them how to use & configure it here. This shows at the top of the manage alerts page on the frontend.
- URL to run the CRON job : This is the URL which will send the Mail Alerts. You shall need to setup your Cron Job to call this url periodically. See examples of Cron Jobs below. Note : If you do not set the Cron Job Emails will not be sent !
- Allow guest users to subscribe email alerts: To allow guest users to subscribe email alerts set this option to 'Yes'.
- Show Jomsocial Toolbar : Show JomSocial Toolbar on email alerts preferences view(Enable only if you are using JomSocial);
B. Design Your Email Alert
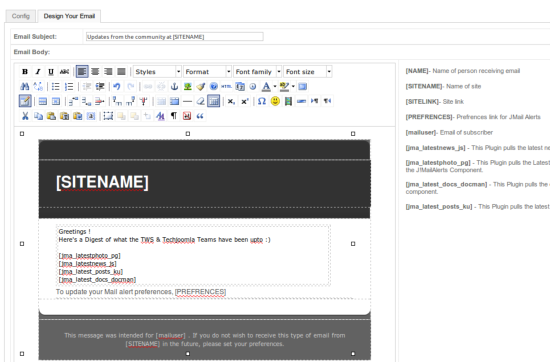
J!MailAlerts comes with a good looking email template. But you might wish to change it to match your site color scheme or your own branding. Doing this is very easy using the Mail Editor. Just make sure that you follow email styling guidelines so that your email looks nice in all browsers & email clients.
Each plugin that you have installed is available as a TAG which is replaced dynamically when the email is sent. For example, the latest news plugin is available as [jma_latestnews]. All installed & enabled plugins are shown as a quick reference to you on the right hand side of the Editor. Some other tags are also made available to you to further personalize your email.
For Email Styling guidelines & details on how to customize output & styling of individual plugins etc. please read the "Stying your Email Alerts" Article in the documentation section. Since version 2.0, J!MailAlerts add Emogrifier which makes styling your emails very easy as you do not need to use inline CSS. Also since 2.0, we have added individual css files & templates for each pluigin that can be overridden or changed as per your needs. All this has been covered in the above documentation article.
C. Install & Configure Individual Alert plugins
Its very important for the settings to be set correctly for all your users that you setup & configure all the Alert plugins you wish to use before running the Sync.
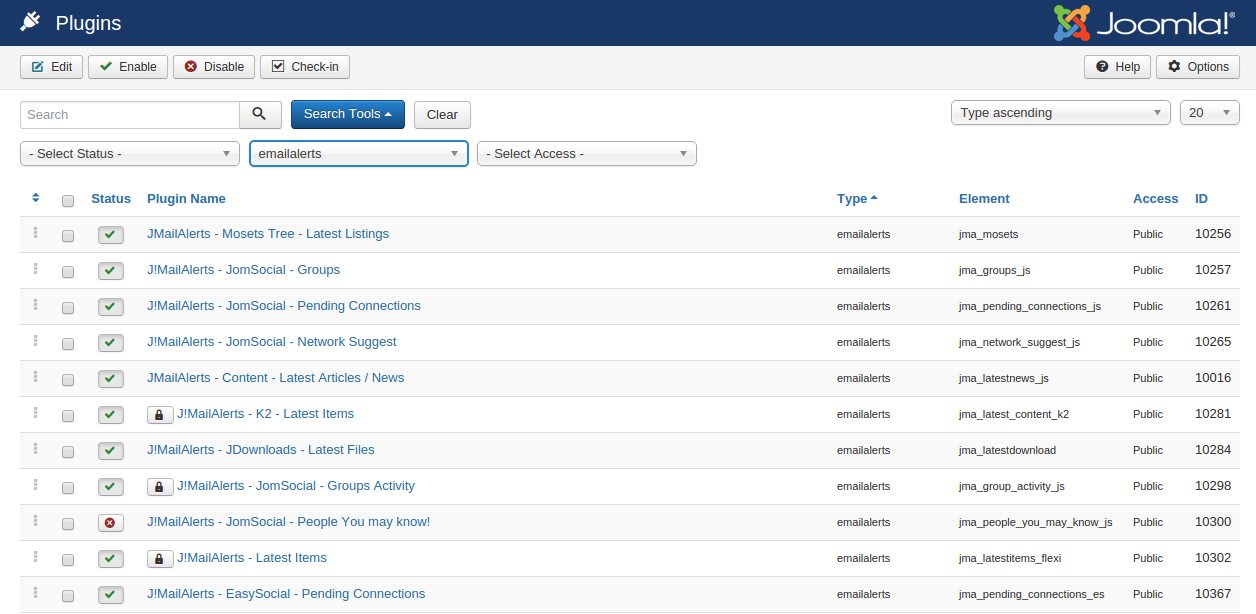
1. You can find J!MailAlerts plugins in the Joomla plugin manager by setting the "type" filter to "emailalerts". The screehshot below shows you a list of some plugins that have been installed & enabled.
2. Each of these plugins needs to be configured to have some default Alert settings.
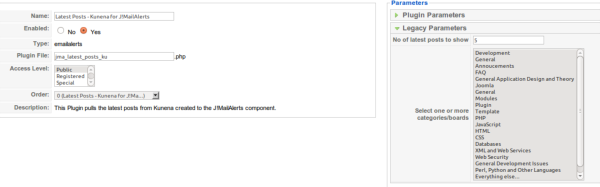
3. Each Plugin has 2 types of Parameters ( some will only have one type) - Plugin Parameters & Legacy Parameters
Legacy Parameters : These are params that the user can override from the front end. You should make sure that these are configured. These will be the default values that will be synced to the users when they are synced or when new users register.
Plugin Parameters : These are params that only the admin can set from the admin. Users have no control over them.
3. Here we show you an example of configuring the Kunena Forum plugin
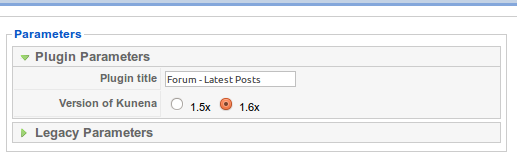
The Plugin Title Parameter in each plugin allows you to control what it is called in the Email when it is set out.
5. Make sure you configure each of your plugins in this manner before going on to the Sync section.
6. Important! Every time you Add any new category or element that affects the plugin parameters, you need to modify the plugin params to select the additional new elements you added if you wish that the users be notified of items in those categories or getting affected by those elements.
7. Important! Make sure all the plugins are set as 'Public' otherwise mails will not be sent or blank mails will be sent
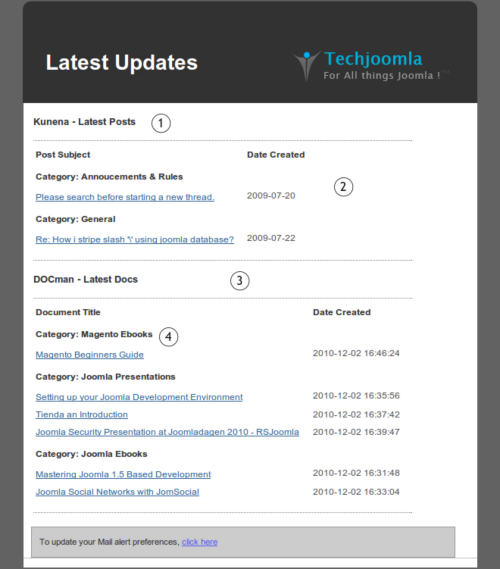
The screenshot below shows how params affect email content
1. Plugin Title of the Kunena Plugin is shown as the Alert Content Title ( 3 shows the same for the Docman Plugin)
2. The Count in the Legacy params affects how the maximum number of posts that can be shown . ( 4 shows the same for the Docman Plugin)
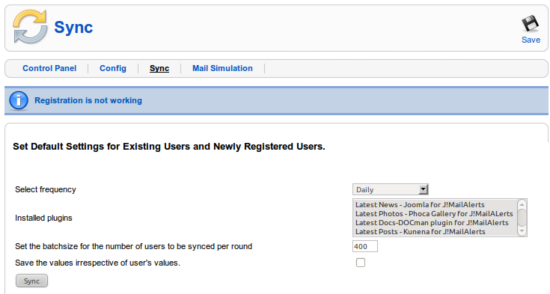
D. Setup the default settings for your users & Sync Them
Note the 2 buttons on the this screen " Save" on top right & "Sync" on bottom left. Note that these buttons carry out 2 separate functions. Please read below carefully to ensure you perform the Sync correctly.
This screen allows you to setup default Alert settings New users who register on your site & also Sync the settings to existing users.
These settings include Email Alert Frequency ( Daily/ Weekly/Fortnightly/ Monthly) & what kind of Alerts to receive i.e. which plugins to parse when sending the Email Alert. Additionally, the settings you set in each plugin in step C are also used while Syncing to new & existing users
1. First Set the default Frequency & select which all Plugins you want to be default.
2. Then click on the Save button at the top right corner. This saves your settings for new users.
3. Now If you are installing the component for the first time, Check the "Save the values irrespective of user's values' & Click on the Sync button. This will sync the values to all existing users.
4. If you are upgrading & do not wish to affect any existing users, there is no need to run the Sync.
5. If you have installed any new J!MailAlerts plugins & want all users to benefit from them immediately, you can override ( destroy) all your current user's settings & sync them by checking override.
6. If you have changed any plugin parameters like say Categories because you added new ones & again want your existing users to be updated about them without them needing to set their alerts to it, you can again proceed as in D.5.
Setting Up a Cron Job
This is very important since its the cron job that initiates sending of alerts. So its a must to set this up or no Alerts will be sent out..
A. On Linux Based Server Environments
There are many ways in which you can setup a cron for example using Wget, Curl or Lynx. Here we show some common examples.
On most Linux server environments, you can simply run the command below as often as you are comfortable. We recommend that you run it every 30 minutes or less. On a busy site, you might want to run it every 10 minutes. The more frequently you run it, the less load it will be on the server at any single cron run.
However you need to make sure you do not go above your hourly server limit for emails..
lynx -source "http://domain.com/index.php?option=com_jmailalerts&view=emails&tmpl=component&task=processMailAlerts&pkey=xxxx" > /dev/null
lynx is a text based browser that is installed in most hosting environments. If you do not have lynx installed, you can use other alternatives such as wget as below,
wget -O /dev/null "http://domain.com/index.php?option=com_jmailalerts&view=emails&tmpl=component&task=processMailAlerts&pkey=xxxx" > /dev/null
A Cron job can be setup using the command line in any of the ways above.
Setting up cronjob in CPanel 11
To add a new cronjob in CPanel 11 variants, logon to your CPanel and click on the "Cronjobs" link under the "Advanced" section as the screenshot below.

Upon clicking on the cronjobs, you will then be directed to a page similar as below. In this example, click on the "Standard" button to proceed.

Then on the screen below, enter the following options,
Command to run: lynx -source "http://domain.com/index.php?option=com_jmailalerts&view=emails&tmpl=component&task=processMailAlerts&pkey=xxxx" > /dev/null
OR
Command to run:
wget /dev/null "http://domain.com/index.php?option=com_jmailalerts&view=emails&tmpl=component&task=processMailAlerts&pkey=xxxx" > /dev/null
- Select every 5 minutes, every hour, every day , every month and every weekdays so that the action above will be executed every 5 mins of the day, in any given month.


Example of configuring the Latest News plugin for J!MailAlerts

Setting Up "Email Alert Preferences Page"
- Login to backend.
- You will need to create a menu item having link to jmail alerts component default view.
- To add new menu item
Goto: Menus=> User Menu=> Click on "New" => Select jmailalerts "default" layout. => Give it a "some name" and Click on "Save"
-Then login in frontend and click on the newly created menu, you will be redirected to the email alert preferences page.