The Control Panel
This is your gateway to setting up SocialAds. Let me quickly
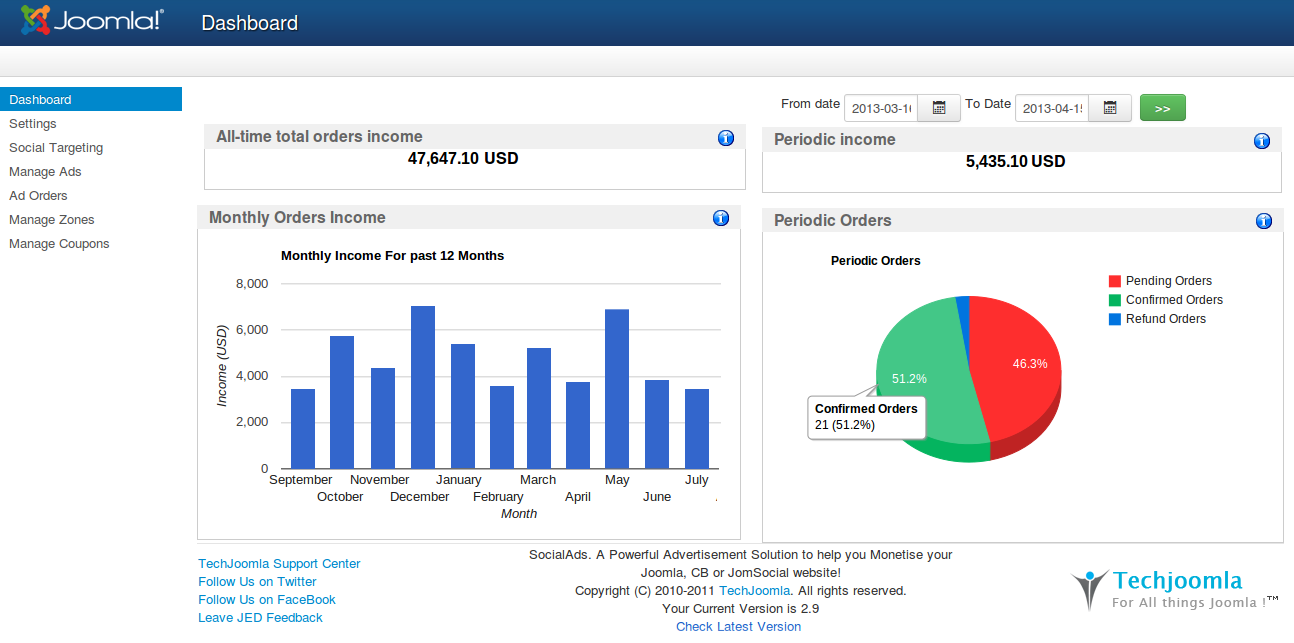
The Dashboard ( V2.6 + ) shows you how much your Ads are earning for you using some snazzy charts.
Also available in the footer is Version checker which you can use to keep track of SocialAds updates.
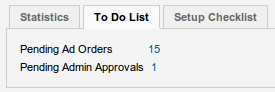
Todo List (Ver.2.7.5 Onwards and for Ver less than 2.9) is the place where the Site Admin can see what all in SocialAds needs his/her attention. Pending Ad Orders and Pending Admin Approvals are shown in it.
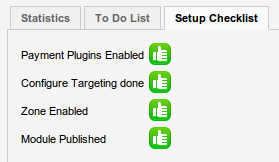
Setup Checklist (Ver.2.7.5 Onwards and for Ver less than 2.9) shows what all needs to be done to complete the setup of SocialAds.
A. Settings
1. Integration Options (Ver.2.5 Onwards)
- Version 2.5 onwards, Social Integration is an option that you can chose. You can now optionally set it to None.. which means you need not use any Social Integration if you dont want to. So effectively you can use SocialAds with just Joomla ( without CB or JomSocial). So if you have CB or JomSocial & want to have Demographic targeting like Facebook, then set this to the extension you use for your User profiles. If you set it to none, you can still use SocialAds as a full fledged Joomla Ads management system.
- JomSocial Toolbar inside SocialAds : Setting this option will show JomSocial Toolbar on all the SocialAds pages. NOTE : This option is only shown when your JomSocial version is greater than version 2.4
2. Set Ad Display Priority
- Set Ad Display Priority : Select Random Priority, if you want Ads to be displayed randomly between Geo Ads or Social Ads or Contextual Ads OR Selecting Custom Priority will let you decide the priority.
- Set Priority : This options decides which ads will be displayed first. Geo Ads or Social Ads or Contextual Ads either of them.
3. GEO TARGETING ( Ver 2.7 Onwards)
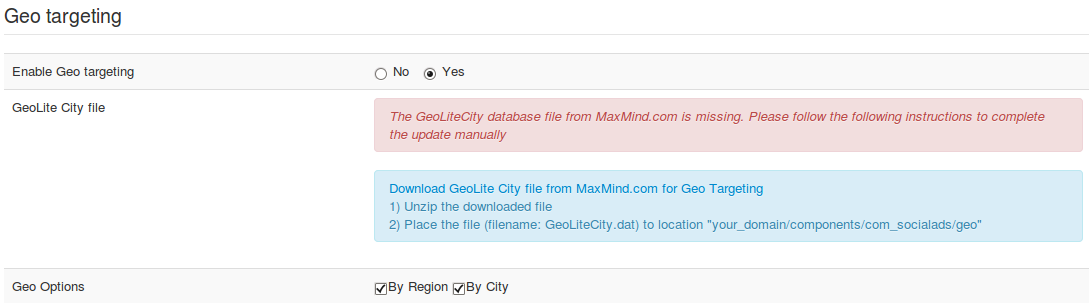
- Enable Geo Targeting : If set to "Yes" then Geo targeting option will be shown in the front end when creating an Ad.
- GeoLite City File : You need to click on the link "Download GeoLite City File from Maxmind.com for Geo Targeting" to download the GeoLite City File from Maxmind. After downloading unzip the downloaded file. Place the file (filename: GeoLiteCity.dat) to location "your_domain/components/com_socialads/geo"
- Geo Options : These options lets the advertiser precisely target via Geo targeting. At least one option should be selected.
4. Contextual Targeting (VER 2.7.5 ONWARDS)
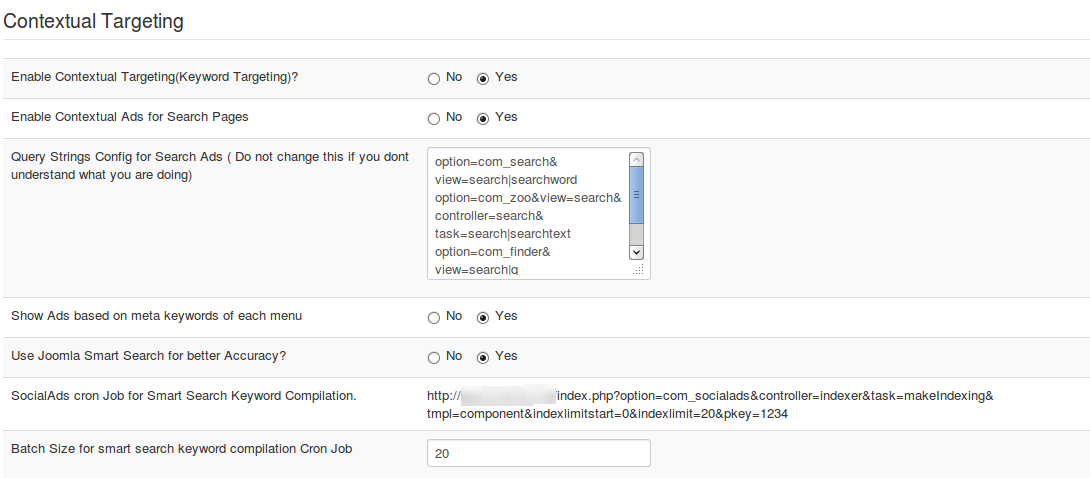
- Enable Contextual Targeting(Keyword Targeting)? : This option will enable Contextual Targeting or Keyword Targeting if set to Yes.
5. Pricing Model Configuration
- Set SocialAds Payment Mode : This option lets you select the Payment model for SocialAds. Advertising Wallet which supports Pay per click, Pay per impression, Daily Budgets & Campaigns and Advertising Wallet Pay Per Ad (Original SocialAds mode) which supports Standard Pay per click, Pay per impression, Pay per day & Slabs. NOTE : When changing the Payment model you will need to migrate your Ads (if any) to the new selected Payment model, clicking on the 'Migrate your Ads' button will auto migrate your Ads. If you need any details about migration click here.
- Select Pricing Options : This setting allows you to select the Payment modes that you wish to allow on your website for SocialAds. You can select between Pay per Click, Pay per Impression & Pay per Day.
6. Advertising Rates
This allows you to setup default pricing for your ads on a per click, per impression or a per day basis. Note that from version 2.5 Onwards, we have introduced Zone pricing. So these settings are just used as default ones when you setup Zones. But Zone pricing overrides these settings if case Zone Pricing is set to on.
- Enable Zone Specific advertising rates ? : If set to Yes, then you will be able to set different pricing rates for each zone seperately.
- Price per Click : This is the price advertisers will need to pay when they post ads on your site & chose the Option "Per Click" pricing.
- Price per Impression : This is the price advertisers will need to pay when they post ads on your site & chose the Option "Per Impression" pricing.
- Price per Day : This is the price advertisers will need to pay when they post ads on your site & chose the Option "Per Day " pricing. (Ver.2.0 Onwards)
- Slab Pricing for Pay per Day : Set this option to "Yes" if you need Slabs in frontend Pricing section in the pricing options select box (Ver.2.7.5 Onwards)
- Show Per Day option, when slabs is enabled : This option lets you select if to Show Per Day option in front end while creating Ad when slabs is enabled.
- Configure Slabs : These are the slabs which will be added in frontend Pricing section in the pricing options select box. You can edit Slab Title, Duration and Price according to your need.(Ver.2.7.5 Onwards)
7. Payment Settings
- Select Payment Gateway : You can select the payment gateway as per needs.
- Enter currency through which user can buy the ad like EUR/USD/GBP : Enter the Currency in which you want to accept payment for Ads
- Enable Terms & Conditions : Allows you to add a Terms & Conditions checkbox at Ad confirmation screen (Ver.2.0 Onwards)
- Set Joomla Article Id for the Terms & Condition : The Terms & Conditions above are linked to this Article Id. (Ver.2.0 Onwards)
- Enforce recurring payments (Ver.2.7.5 Onwards) : This option will enforce recurring payment methods. NOTE: This applies to Authorize.net and Pay Per Ad Payment Model.
8. Thresholds
- Minimum Charge : This is the minimum value of advertising that an advertiser needs to buy at any sale, NOTE : This appies for Pay Per Ad Payment Model.
- Low Balance Threshold : This is the value at which a balance running low mail is sent to the advertiser.
- Time interval between clicks & time interval between impressions : Set these values in seconds. These are to avoid fraudulent impressions .
- The time interval between which clicks are counted (seconds) : Set these values in seconds. These are to avoid fraudulent clicks.
- Archive Stats : Setting this option to "Yes" will archive the stats for all the Ads when the Cron URL runs. (Ver.2.7.5 Onwards)
- Maintain stats for : The stats as stored earlier will be maintained for the entered number days. (Ver.2.7.5 Onwards)
9. ads Settings
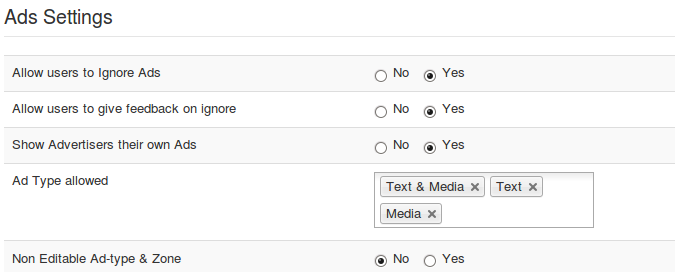
- Show Advertisers their own Ads (Ver.2.7.5 Onwards) : Enabling this option will show the Ad owner thier Ads. NOTE : The Ads targeted to the Advertisers will be affected if set to 'Yes'.
- Allow users to Ignore Ads : This will allow a user to stop a particular ad from showing for them.
- Allow users to give feedback : On ignore, the users are asked feedback as to why they ignored the ad.
- Ad Type allowed ( Ver 2.6 Onwards) : Only the selected Ad-types will be made available to the advertisers in the create ad process.
- Non Editable Ad Types & Zones : Set this to yes if you do not want the end user to be able to edit Ad type & Zone when the user comes to the create Ad page from a certain Zone module.
10. Media Settings
- Maximum image size ( in bytes ) : This is maximum image upload size in bytes (Ver.2.0 Onwards)
- Flash uploads : Allow to upload Flash(swf) files when creating Ads.(Ver.2.7.5 Onwards)
- Video uploads : Allow to upload video files when creating Ads.(Ver.2.7.5 Onwards)
11. Social Engagement (Ver.2.7.5 Onwards)
- Enable JBolo integration? : This will allow the users to chat with the Ad creator via Jbolo.
- Enable AddThis social sharing button? : This option will display AddThis social sharing button for the Ads in the module.
12. Other Settings
- Admin Approval Needed : Select yes if admin approval is needed for an Ad otherwise the Ad will be displayed to the all users without admin permissions for the approval.
- Admin Approval Needed for Ad edits ? : Always Approval of the Admin is required even when the Ad is updated
- Send Weekly Stats Mail : If set to Yes Weekly Stats Mail will be sent to all the advertisers giving them a summary of how their Ads have performed.
- Introduction text for Weekly Stats mail ( Ver 2.6 Onwards) : This is the introduction text which will be seen in the Weekly Stats mail sent to all the advertisers.
- Display Estimated Reach Count of people ( Ver 2.6 Onwards) : If set to Yes then the estimate reach count of users the Ad will be seen by will be shown while setting up targeting for an Ad (ie frontend).
- Estimated Reach Offset ( Ver 2.6 Onwards) : This is the offset which will be added to the reach count of users while displaying the estimated reach count.
- Show registration form to guest users ( Ver 2.6 Onwards) : Show the Joomla registration form to the guest users when going to create Ad page and redirecting create ad page after registration process.
- Cron Key ( Ver 2.6 Onwards) : This is the cron key is used to check if the cron job has been authorised by the administrator.
- Cron job url for Weekly Stats email ( Ver 2.6 Onwards) : This is the cron url for sending Weekly stats (ie summary of all the created ads for the past week) mail to all the advertisers. Please see to it that you setup your cron job strictly for per week.
- Single Cron URL ( Ver 2.7.5 Onwards) : This is a single cron job URL for Weekly Stats Mail and Archiving Stats. Please see to it that you setup your cron job strictly for per week.
- Cron url to clean the un-used images ( Ver 2.6 Onwards) : This is the url for deleting all the unused images for SocialAds from the folder images/socialads.
Create Menus
You need to create menus for creating an ad or managing an ad.
Go to Menus -> Mainmenu or any other menu where you want to create a menu item.
Then click on new, like the following screenshot, you will be able to create menus for Build Ad and Manage ads.
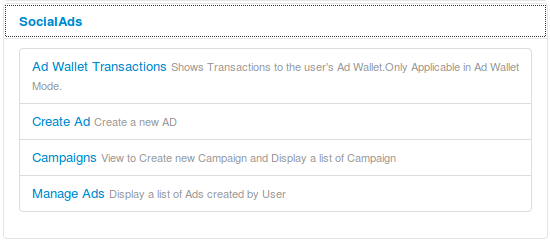
If you are using Ad Wallet Payment Model, you will additionally need to create menus for Campaigns and Ad Wallet Transactions.