
The Control Panel
This is your gateway to setting up SocialAds. Let me quickly
The Dashboard ( V2.6 + ) shows you how much your Ads are earning for you using some snazy charts.
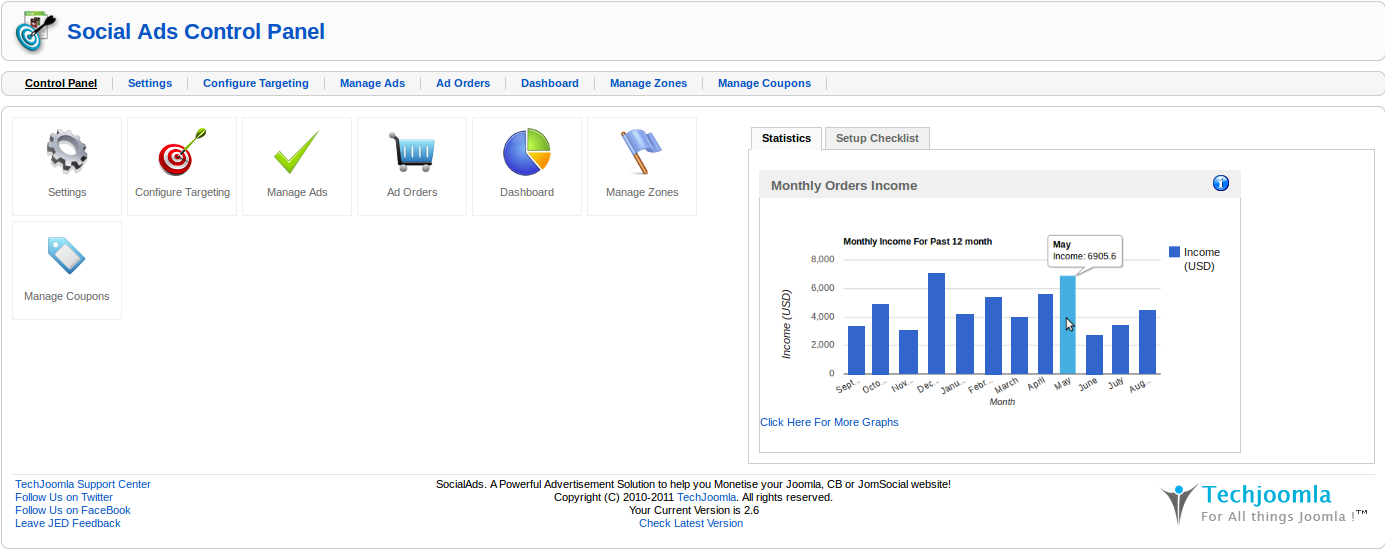
Also available in the footer is Version checker which you can use to keep track of SocialAds updates.
A. Settings
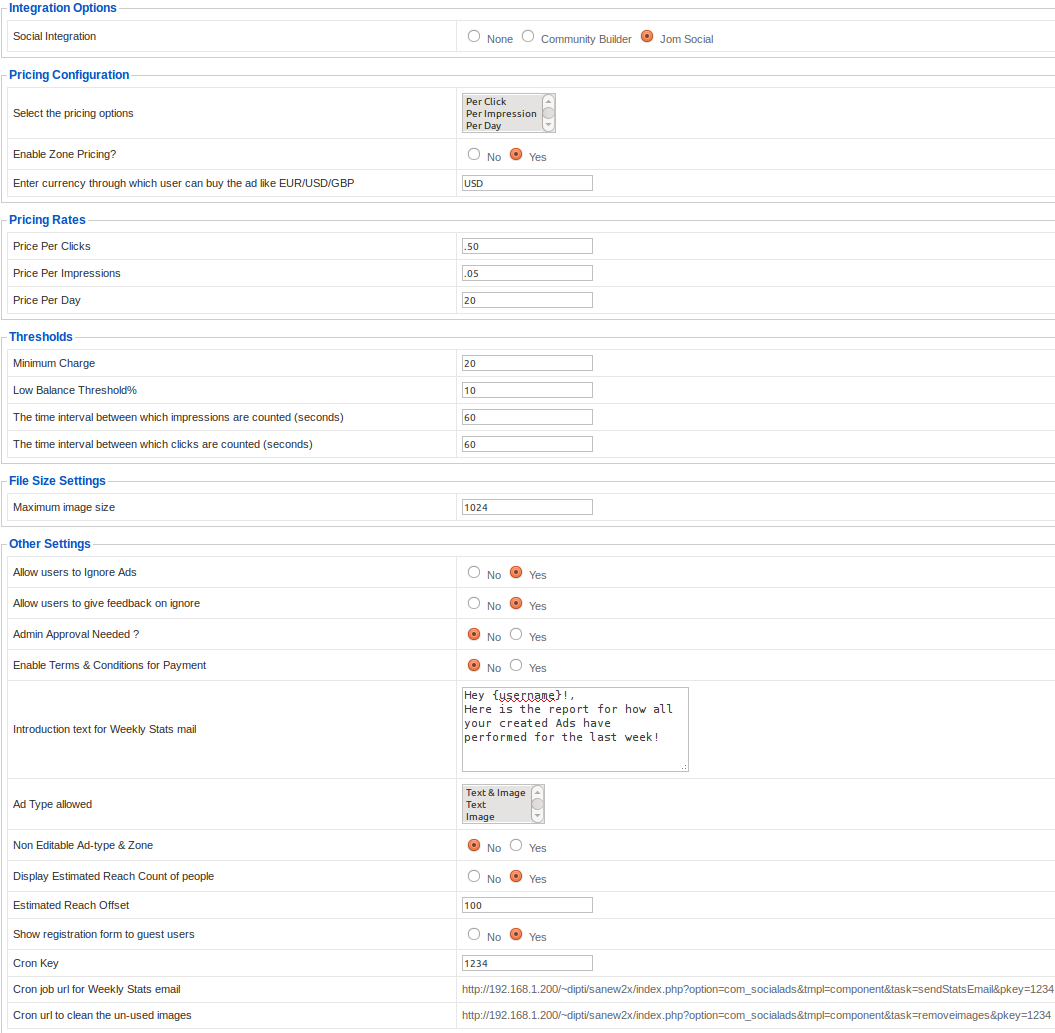
1. Social Integration (Ver.2.5 Onwards)
Version 2.5 onwards, Social Integration is an option that you can chose. You can now optionally set it to None.. which means you need not use any Social Integration if you dont want to. So effectively you can use SocialAds with just Joomla ( without CB or JomSocial). So if you have CB or JomSocial & want to have Demographic targeting like Facebook, then set this to the extension you use for your User profiles. If you set it to none, you can still use SocialAds as a full fledged Joomla Ads management system.
2. Pricing Configuration( Ver 2.5 Onwards)
a. Select Pricing Options : This setting allows you to select the Payment modes that you wish to allow on your website for SocialAds. You can select between Pay per Click, Pay per Impression & Pay per Day.
b. Enter currency through which user can buy the ad like EUR/USD/GBP : Enter the Currency in which you want to accept payment for Ads
c. Enable Zone Pricing : If set to Yes, then you will be able to set different pricing rates for each zone seperately.
3. Pricing Rates
This allows you to setup default pricing for your ads on a per click, per impression or a per day basis. Note that from version 2.5 Onwards, we have introduced Zone pricing. So these settings are just used as default ones when you setup Zones. But Zone pricing overrides these settings if case Zone Pricing is set to on.
a. Price per Click : This is the price advertisers will need to pay when they post ads on your site & chose the Option "Per Click" pricing.
b. Price per Impression : This is the price advertisers will need to pay when they post ads on your site & chose the Option "Per Impression" pricing.
c. Price per Day : This is the price advertisers will need to pay when they post ads on your site & chose the Option "Per Day " pricing. (Ver.2.0 Onwards)
4. Thresholds
a. Minimum Charge : This is the minimum value of advertising that an advertiser needs to buy at any sale.
b. Low Balance Threshold : This is the value at which a balance running low mail is sent to the advertiser.
c. Time interval between clicks & time interval between impressions : Set these values in seconds. These are to avoid fraudulent impressions .
d. The time interval between which clicks are counted (seconds) : Set these values in seconds. These are to avoid fraudulent clicks .
5. File Size Settings
a. Maximum image size ( in bytes ) : This is maximum image upload size in bytes (Ver.2.0 Onwards)
6. Other Settings
a. Allow users to Ignore Ads : This will allow a user to stop a particular ad from showing for them.
b. Allow users to give feedback : On ignore, the users are asked feedback as to why they ignored the ad.
c. Admin approval : Set this to yes if you want to approve ads before they go live.
d. Enable Terms & Conditions : Allows you to add a Terms & Conditions checkbox at Ad confirmation screen (Ver.2.0 Onwards)
e. Set Joomla Article Id for the Terms & Condition : The Terms & Conditions above are linked to this Article Id. (Ver.2.0 Onwards)
f. Introduction text for Weekly Stats mail ( Ver 2.6 Onwards) : This is the introduction text which will be seen in the Weekly Stats mail sent to all the advertisers.
g. Ad Type allowed ( Ver 2.6 Onwards) : Only the selected Ad-types will be made avialable to the advertisers in the create ad process.
h. Non Editable Ad Types & Zones : Set this to yes if you do not want the end user to be able to edit Ad type & Zone when the user comes to the create Ad page from a certain Zone module.
i. Display Estimated Reach Count of people ( Ver 2.6 Onwards) : If set to Yes then the estimate reach count of users the Ad will be seen by will be shown while setting up targeting for an Ad (ie frontend).
j. Estimated Reach Offset ( Ver 2.6 Onwards) : This is the offset which will be added to the reach count of users while displaying the estimated reach count.
k. Show registration form to guest users ( Ver 2.6 Onwards) : Show the Joomla registration form to the guest users when going to create Ad page and redirecting create ad page after registration process.
l. Cron Key ( Ver 2.6 Onwards) : This is the cron key is used to check if the cron job has been authorised by the administrator.
m. Cron job url for Weekly Stats email ( Ver 2.6 Onwards) : This is the cron url for sending Weekly stats (ie summary of all the created ads for the past week) mail to all the advertisers. Please see to it that you setup your cron job strictly for per week.
n. Cron url to clean the un-used images ( Ver 2.6 Onwards) : This is the url for deleting all the unused images for SocialAds from the folder images/socialads.
B. Configure Social Targeting
1. The Basics
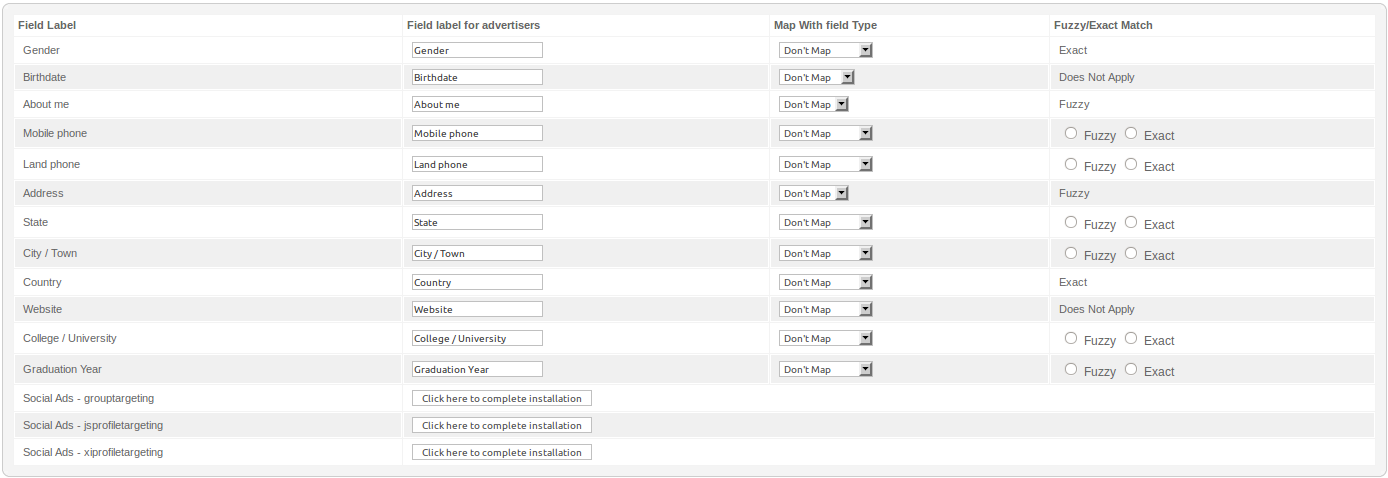
This is an extremely critical part of the configuration & will play a large role in making targeting easy for end users. The admin has to chose only those fields that are most likely to be useful for targeting . Any other fields like Phone Numbers , Website etc should be set as "Don't Target".
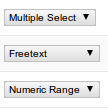
You have the option to set any field in CB/JomSocial as a respective targeting field for Social Ads. There is variety of field types that you can map a JomSocial field as in SocialAds. Fields can be targeted as Free Text, Multiple Select, Single Select, Numeric Range & Date Range.
We have added some basic validation here to make your Job Easier.. For instance only Single & Multiselect fields in JomSocial can be mapped as Single or Multi Select fields for targeting.
Similarly, only date fields can be set as a date range in SocialAds.
Some tips for you to setup the mapping correctly are given below.
- Make sure you select fields , most likely to be relevant to your advertisers.
- Set Don't Map to fields like telephone, Website etc which cant be used for targeting.
- Make sure you select minimum possible number of fields. The lesser the fields , the easier it is for your advertisers.
- We have designed the system for maximum flexibility to be able to work with any JomSocial field you add. So you can't have Age matching against a Birthday.. But you can set a Birthday range which effectively gives you age matching.
- Make sure you have fields like Interests that can be used by users for targeting.
2. Understanding Fuzzy & Exact Targeting ( Since ver 2.0 )
Please understand this section correctly before you do the targeting. DO NOT set all fields to EXACT without understanding what it does.
General Use Definition
Exact Matched Fields : Ads are only shown then these fields match exactly. Selection is only available for textbox fields mapped as textbox in SocialAds. Should be used for fields like City, State which need exact Matching. Typically input box fields which will contain a single value like City, State should only be set as Exact for best results.
Fuzzy Fields : Fields like About me, Interests etc which contain elements that will typically need a fuzzy match. Generally when in doubt set fields to fuzzy.
In SocialAds 1.0 everything was matched using Fuzzy targeting except some fields that we intelligently detected & used for exact matches for instance Gender & Country. This worked very well.. but we felt the need to improve this especially for the fields of the type "Inputbox/textbox". These fields are typically used for fields like City, State etc, which should ideally be matched exactly when showing ads.
SocialAds uses a complex algorithm to try & deliver accurate ads to users. Since version 2.0 to make this algorithm even more flexible & powerful, the feature to set fields of the type "Input box" in CB or JomSocial to Exact or Fuzzy has been introduced. We are already intelligently setting this value to fuzzy or exact where possible, but in case of input box fields, we need to take your input on it. This lets you chose inputbox fields like State, City etc to be effectively used for targeting.
3. Targeting plugins ( Ver 2.6 Onwards)
Please refer the documentation here for setting up the targeting plugins.
Note that this adds a lot of power.. but it needs to be set with a lot of thought behind it, as inconsiderate use of this feature ( you might be tempted to set everything possible as exact) will lead to your ads not being shown at all !
Please note :
- Targeting should be done by putting a lot of thought behind it.
- Make sure you read our tips above before you do it.
- Fields already targeted cannot be re targeted without resetting everything, but new fields added to CB/ JomSocial can be added to the targeting
- Clicking the Reset will not only Reset the Targeting but will also remove the Targeting for any Ads already existing on the system. This needs to be done to prevent data corruption & incorrect targeting.
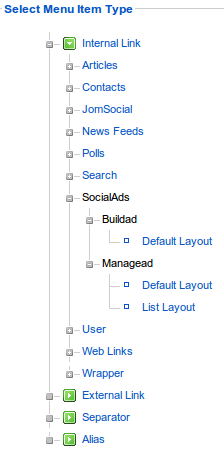
C. Create Menus
You need to create menus for creating an ad or managing an ad.
Go to Menus -> Mainmenu or any other menu where you want to create a menu item.
Then click on new, like the following screenshot, you will be able to create menus for Build Ad and Manage ad.
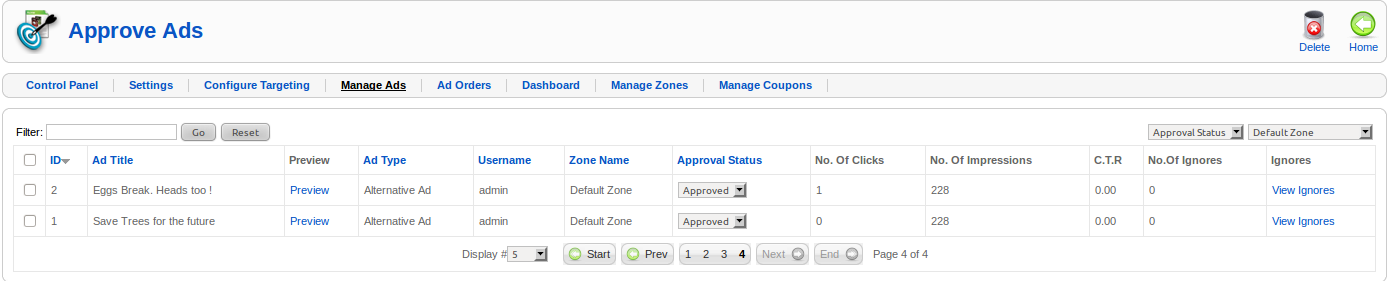
D. Approve Ads
If Admin Approval is set to yes, You will be able to approve or reject the Ads based on the contents in the Ad.
You will be able to preview the Ad by clicking on the preview link. When a user creates a new ad, the ad should be shown as pending in this screen. The site administrator can then review the ad contents to approve or reject the ad. If you reject the ad, then a dialogue box will come up where you can enter a message which will be sent to the user as the reason for rejection. You can set Ads to be approved automatically without your intervention from the settings configuration.
Version 2.5 onwards you can also see the basic stats of an ad from here & can also see the number of ignores an ad has recieved. By clicking on the View Ignores link, you can see the reasons why the ad was ignored.
Version 2.6 onwards you can delete the Ads from the backend Manage Ads view. Also there is another filter for zones, so that you can filter the ads of specific zones.
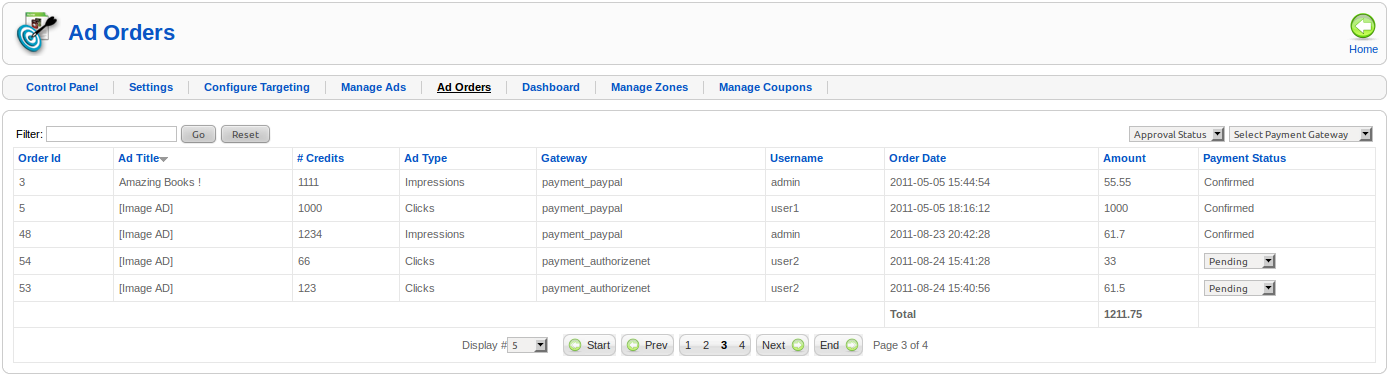
E. Ad Orders
In the ad orders screen, you can see the orders that have been placed against ad. You can filter these orders according to Pending, Confirmed & Refunded.
If an order is pending, you can manually mark it as confirmed/refund. This will need to be done especially in case of Offline payment options like Pay by Check or Pay by PO payment options.
Version 2.6 onwards you will have a filter for payment gateway to sort out your Ad orders.
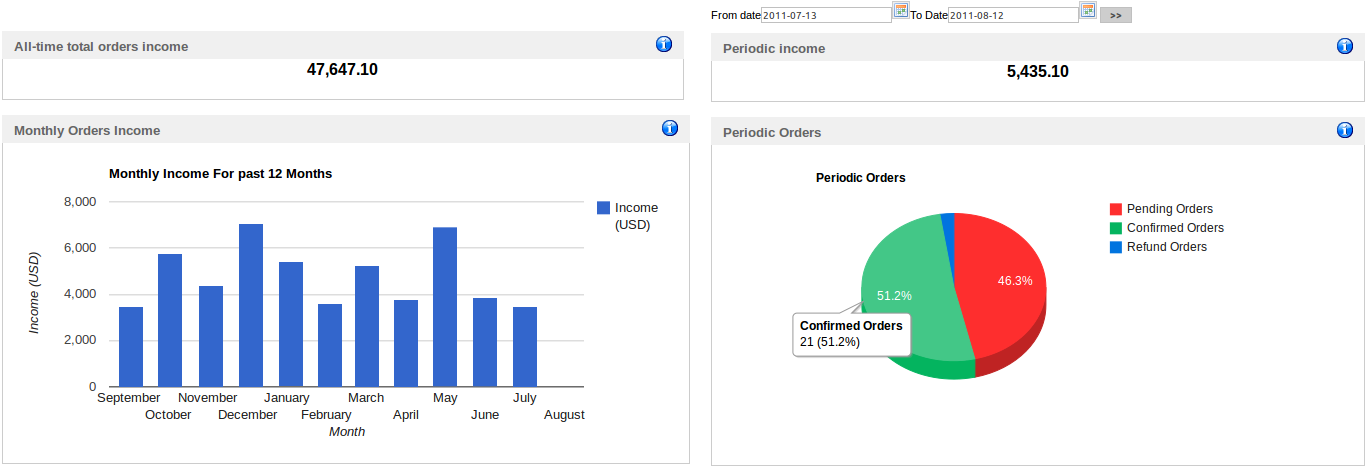
F. Dashboard (Ver 2.6 Onwards)
This view will help you to keep a track of how much money your site is making with SocialAds. There is also a date filter which will let you set the duration of statistics.
G. Manage Zones (Ver 2.5 Onwards)
 What are Zones ?
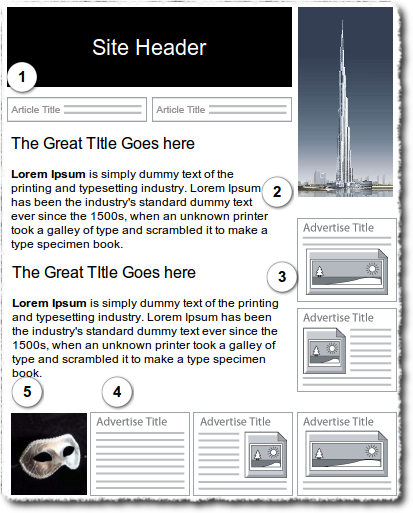
Introduced from version 2.5 of SocialAds, Zones is a feature that makes SocialAds supremely flexible to use & maximise the Monetisation potential of your Joomla website. You will recall that till version 2.0X, SocialAds only had the ability to create text & image ads like Facebook, but since some of the fields were not compulsory, you could still create text only ads. With Zones, the administrator can utilise the variety of Module positions available in Joomla & configure a "Zone" which allows you to configure an "Ad Space" such that it can fit in nicely in the specific Module position you have on your Joomla site. For instance, if you have a module position on your site which would be great for a small banner, you can go ahead & create a Zone such that it can accept image ads of the dimension of say 480X60 px. Whats more, with Zone specific pricing, you can now charge premium rates for the hotter real estate on your site now ! For example, if your analysis shows that the top header is really popular on the heat map, go ahead & charge more for ads shown there !
So in a Nutshell, a Zone is a "Space Definition" for an ad that decides
a. What type of Ads can go in there ( Text/ Text & Image / Image Banners)
b. What the dimensions of the image would be
c. What the Character limits would be for the Title & description in case of Text & Text & Image ads
d. What price you will charge for that space.
Finally you would create a new SocialAds module & decide which "Zone" to apply to it & publish it in the correct place. If you use this correctly, you can have as many Ad Formats as Google Adsense or if you use your creativity, even more :)
If you look at our demo site, we have created Skyscrapers, Gmail like text ads, 200X200 banners, Text and Image ads like Facebook & what not !
SocialAds 2.5+ versions shall ship with plenty of pre created Zones that we have found to be pretty universal, but you are not restricted by that at all. You can create a Zone to fit any requirement that you might have !
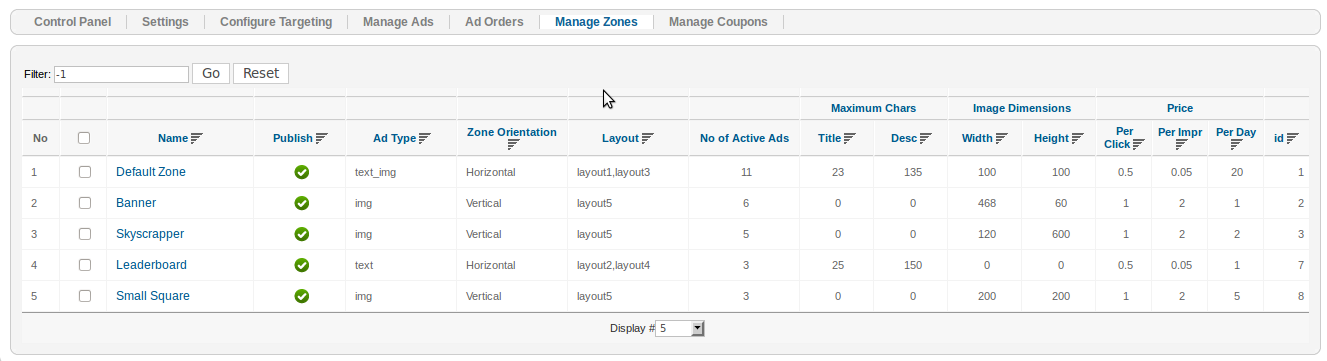
Managing the Zones
The main Zone list view shows you a Quick overview of the Zones you have on your website as well as important information about it including the number of Ads a Zone has, & Zone specific pricing as well as the various constraints a Zone has like Character limits & Image dimensions. Note that each Zone needs to have a Published Module associated with it in order to be able to display the Ad. In case any of the Zones does not meet this requirement, a Yellow warning sign shall be displayed next to that Zone. Such Zones will also not be shown to advertisers when creating the Ad.
Creating a new Zone
The first thing you need to look at when you create a new Zone, is the module positions available on your site which are suitable for showing advertisements. These positions can be anywhere on your site. Study the dimension constraints of these positions when creating new Zones. Let us look at the various fields that define a Zone.
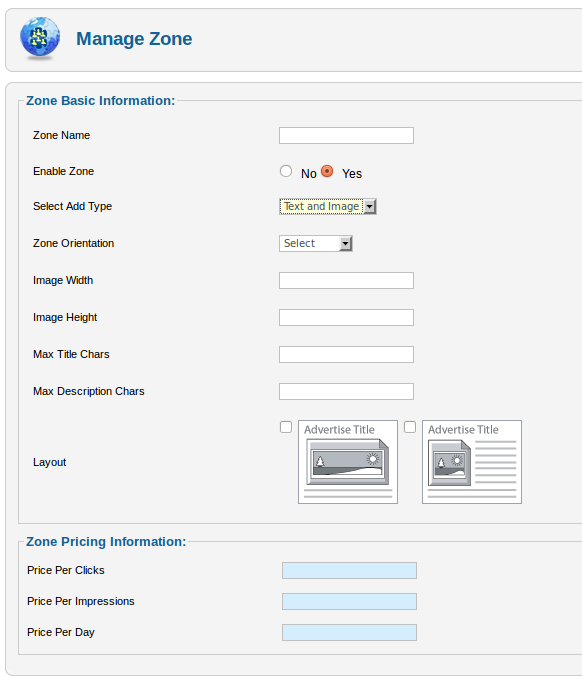
Basic Zone Configuration
a. Zone Name : Enter a name that will be logical to end users/ advertisers for example "Skyscraper 120X600"
b. Enable Zone : Publish or Unpublish Zone
c. Select Ad Type : Select between Text Ads/Image Ads/ Text & Image Ads to allow for this Zone
d. Zone Orientation : This is where you select if you want the Ads in this Zone next to each other ( Horizontally) or one below the other (Vertically). From version 2.5 onwards, you can display multiple ads in a module. The number of ads can be set in the module parameters.
e. Image Width & Height : Set Image Width & height constraints for the images that will be uploaded.
f. Max Title & Description Characters : This is where you define character limits for the Ad Title & Description.
g. Select Layouts : Introduced in Version 2.5, Layouts are basically Ad Templates which give you full control on how a Ad is laid out. Layouts are basically plugins of the type "socialadslayouts". You can have multiple layouts against each type of Ad thus making it possible to create many different types of Ads. SocialAds ships with 5 layout plugins by default & we shall soon release tutorials on how you can make your own layouts & modify existing ones.
Selected Layouts will allow the advertiser to chose how he wants his ad to be laid out.
Zone Pricing Configuration
This will allow you to set specific pricing for this Zone for each payment mode i.e. Per Click, Per Impression & Per Day.
H. Manage Coupons (Ver 2.5 Onwards)
From version 2.5 onwards, we have introduced a Coupon system for SocialAds making it possible for you to offer promotions to your users by giving them Coupons . A variety of options have been made available in the coupon manager making it possible to restrict the coupons in various ways. Both Absolute value & percentage type coupons are supported.
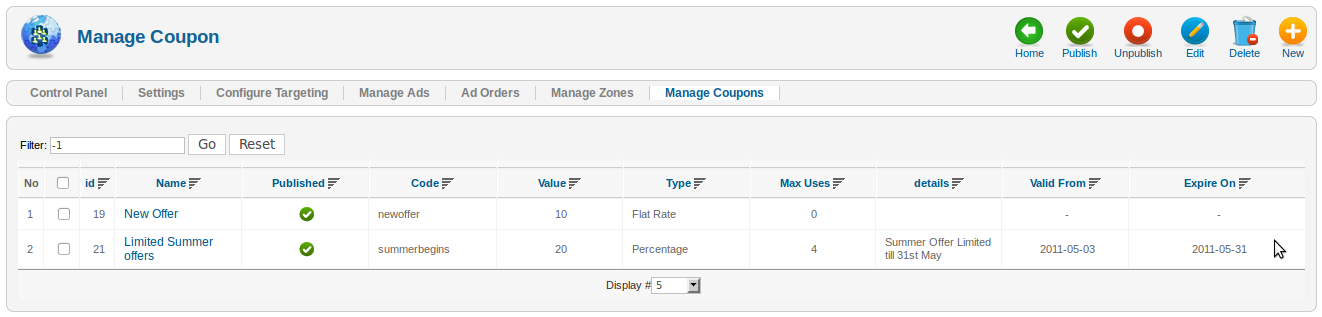
The Coupon List view
This view allows you to get a quick snapshot of the available coupons & basic restrictions they have.
Creating your own Coupons
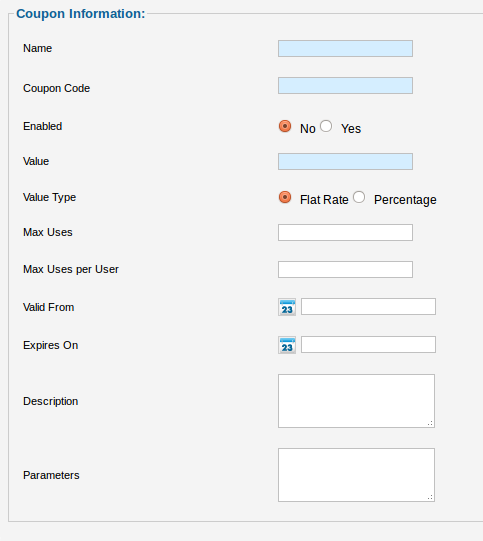
Making your own coupons is a breeze with the SocialAds coupon manager. Inspired from Tienda, the coupon manager is very flexible in letting you configure your coupons.
Name : Internal Name for your coupon
Coupon Code : This is the code that users would use when they want to get a promotion. For example "HOLIDAY20"
Enabled : Allows you to publish or unpublish a plugin
Value : Set a Value the coupon. Eg : 20
Value Type : Set whether its a Flat value or Percentage type coupon
Max uses : Total Uses allowed for the coupon.
Max uses per user : The number of times you want a single user to use this coupon
Valid From & Expires on : Set From to dates for the coupon validity
Description : Internal Use
Params : You can ignore this for now. This is for future use & external integrations
I. Module Parameters
Note that for each Zone you have, you need to have atleast one module published & configured to use that Zone .
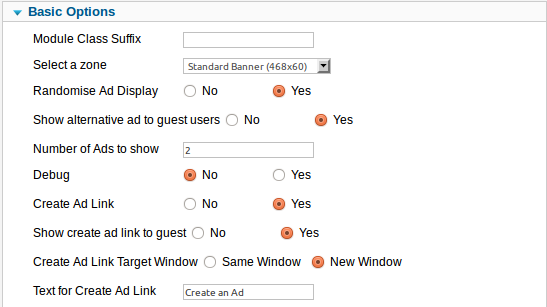
Select Zone : Select the Zone that this module should use to show the Ads.
Randomise Ad Display : Selecting this will randomly show Ads. If its not enabled, only most relevant ads will be shown.
Show Alternate Ads to Guests : This allows you to show Alternate or Public service ads that the admin can configure. These are free ads that are shown in the absence of Paid ads.
Number of Ads : Decide how many ads you want to show in the module. Works in conjunction with the Zone Orientation to decide if they are shown Vertically or horizontally.
Debug: Switch this to 'yes' to show relevance on front end for debugging purposes. Keep off for production sites.
Create ad link & text: This is shown below an ad to provide easy access to users to create ads.
Create Ad Link Window : Select if this should open in a new window or the same window.
Show Create Ad link to guest (Ver 2.6 Onwards): This is to decide whether to show the Create Ad link to logged out users (ie guest users).
J. Login module (Ver 2.6 Onwards)
You need to create a copy of the native Joomla Login module, publish it in position 'sa_login'. This will display the Login module on the registration page, which will be displayed when a logged out user goes to the Create Ad screen.
K. Types of Ads
There are 4 types of ads that the advertisor or administrator can create based on who they are shown to & when they expire.
Guest Ads : These ads are Paid ads that are NOT targeted. If this option is checked, then the Advertiser skips the targeting section.
Normal Targeted Ads: Any registered user should be able to create this ad from the Create ad page. These ads have targeted option and the ads are shown to their targeted audience except the person who has created the ad.
Unlimited Targeted Ads: Only Administrator can create these ads from the front end create ad view. Unlimited ads are normal targeted ads but they do not expire i.e. they have unlimited credits.
Alternative Ads: Only the Admin can create these ads. These ads are shown when no other ad is available for a particular user. We recommend you to create a few alternative ads on your site so that the module space is not left blank.
Next Step is to configure the payment plugins of your choice. Please read the separate tutorial for that from here.