
So you are excited about the Joomla common payments API & want to know how to integrate it into your Joomla extensions? Well, look no further, this tutorial will explain all the basic concepts & show you how you can add Payments to your extension in just three easy steps !
The coolest part about using the Joomla Payments API is that once you have completed this tutorial, your extension will be supporting 20+ payments plugins & all that in just 4 easy steps.
Get Your Basics Right
The Common Payments API is an abstraction layer that allows you to use a few simple plugin triggers to integrate payments into your own extensions. Your extension needs to take care of all the pre payment calculations & post payment processing.
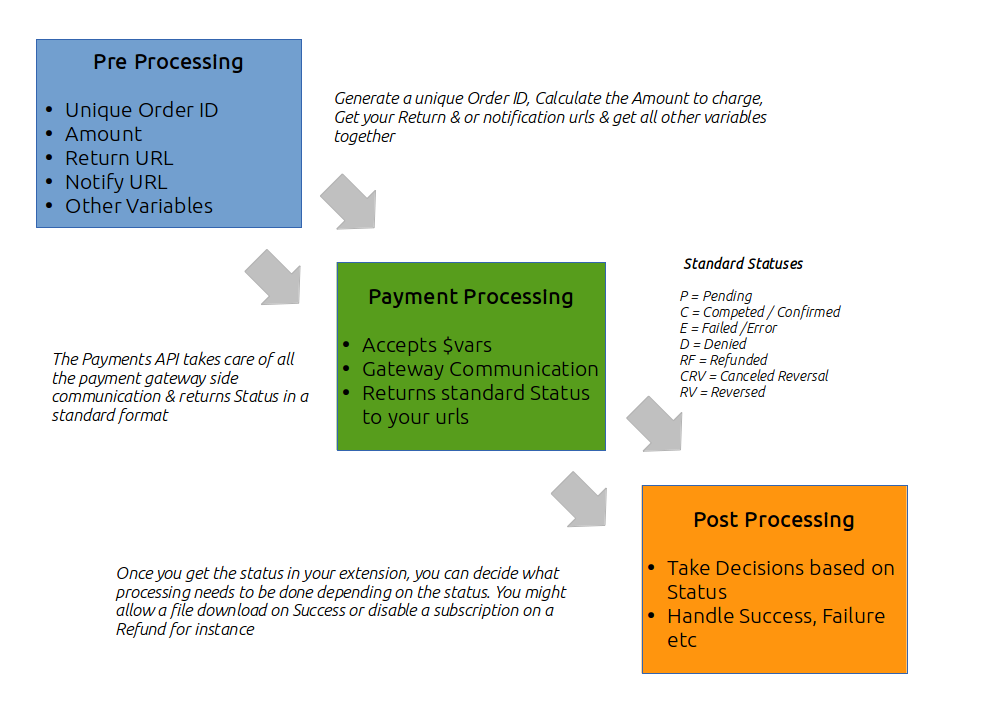
Lets look at this simple schematic to see how the API works.
Gather the Variables
As you will see above, on the pre-processing side, you need to get some information together in the form of an array. This includes some compulsory fields the payments API needs. These include an unique order id, the amount to charge, Return url & the notify url. The full list of variables has been listed further in the tutorial. Note here that the Notify url & the Return urls are parts of your extension & this is where the payment gateway will send back data to you.
- $vars->order_id
- $vars->user_id
- $vars->user_firstname
- $vars->user_email
- $vars->phone
- $vars->item_name
- $vars->submiturl
- $vars->return
- $vars->cancel_return
- $vars->url
- $vars->currency_code
- $vars->comment
- $vars->amount
Pass them to the Payments API via triggers for Processing
The payments API will handle all the payment gateway side communication & translate the gateway response into a standard format with standard Payment statuses. The standard statuses returned are listed below.
- P = Pending
- C = Competed / Confirmed
- E = Failed /Error
- D = Denied
- RF = Refunded
- CRV = Cancelled Reversal
- RV = Reversed
Do your Post Processing
Once you receive the Status from the payment gateway api, you need to do your post processing logic based on this status in your extension. This might be marking an order confirmed or allowing a file download when you get a Completed Status or disabling a subscription when you get a refunded or Cancelled status.
Lets Dive into the Code !
Now that you have got your basics right, its time to actually start looking at some code & how you will build your user interface. And we are going to do that in 4 Easy steps !
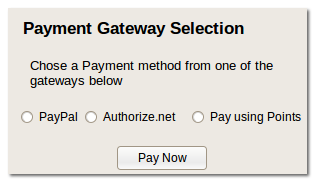
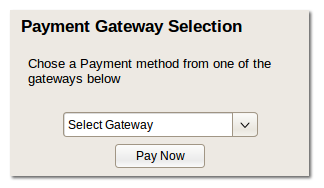
- Letting the User choose which gateway to use by showing a list of Payment Gateways
- Render the Payment Gateway form
- Verify & Validate variables
- Add the On Process Trigger in your Notify URL

1. Get Available Gateways & Allow the user to choose which Gateway to use
We recommend that when you build your component, you add a option parameter that lets the admin choose which payment gateways he wants to allow to be used in that particular component. This is very useful if you have more than one extension using the common payments system on your site which is pretty likely.
A. Let the Admin Choose which Payment Gateways to allow
You can use the element that we have made available in the Sample development component to do this easily.
B. Render Allowed Gateways on the Frontend
Now next, you need to get the final list of payment plugins to show to your end user. The code snipped below will help you do that. The payments API trigger onTP_GetInfo($gateway_param) will help you do this. This trigger will return an array of payment gateway details. The $gateway_param, lets you pass all plugins which are configured with component from backend.
// getting payment gateway list which is configured with component from backend.
$dispatcher = JDispatcher::getInstance();
JPluginHelper::importPlugin('payment');
if(!is_array($params->get( 'gateways' )) ){
$gateway_param[] = $params->get( 'gateways' );
}else{
$gateway_param = $params->get( 'gateways' );
}
$this->gateways = $dispatcher->trigger('onTP_GetInfo',array($gateway_param));
Now you can render this array either as a Radio or drop down list as per your choice.
All this of course needs to be done on a view in your extension where you need to render the above selection.
2. Render Payment Form onsite/offsite on order detail page
Once the user selects the payment gateway of choice, we need to show the Payment form which will take care of the next part. To construct this, you need the standard object which makes all data we have specified above available & the chosen payment plugin. Take care that the variables need to be constructed as a standard Joomla object.
A. Get All the variables & construct them as a Standard Joomla Object
$vars = new stdClass;
		$vars->order_id = $orderid;
		$vars->user_id=$pass_data->user_info_id;
		$vars->user_firstname = $pass_data->name;
		$vars->user_email = $pass_data->email;
		$vars->phone =!empty($pass_data->phone)?$pass_data->phone: '';
		$vars->item_name = "Test Techjoomla Product";  //  order prod name

		// URL SPECIFICATIONS
		$vars->submiturl = JRoute::_("index.php?option=com_tjcpg&controller=payment&task=confirmpayment&processor={$pg_plugin}");
		$vars->return = JURI::root().substr(JRoute::_("index.php?option=com_tjcpg&view=orders&layout=order&orderid=".($orderid)."&processor={$pg_plugin}&Itemid=".$orderItemid,false),strlen(JURI::base(true))+1);

		$vars->cancel_return = JURI::root().substr(JRoute::_("index.php?option=com_tjcpg&view=orders&layout=cancel&processor={$pg_plugin}&Itemid=".$orderItemid,false),strlen(JURI::base(true))+1);
		$vars->url=$vars->notify_url=JRoute::_(JURI::root()."index.php?option=com_tjcpg&controller=payment&task=processpayment&orderid=".($orderid)."&processor=".$pg_plugin,false);
		$vars->currency_code = $pass_data->currency;
		$vars->comment = $pass_data->customer_note;
		$vars->amount = $pass_data->amount;
B. Trigger onTP_GetHTML() to display the form
//TRIGGER onTP_GetHTML() TO GET PAYMENT FORM
//$pg_plugin is the name of the chosen plugin in step 1
//$vars is the standard Joomla object containing all required variables
JPluginHelper::importPlugin('payment', $pg_plugin);
$dispatcher = JDispatcher::getInstance();
$html = $dispatcher->trigger('onTP_GetHTML', array($vars));
Now you can display this in your view.
3. Validate Data
In order to make sure that the data sent is not tampered by end user, this function revalidates the data.
4. Add onProcess trigger in your notify URL
You need to add the Payments API trigger onTP_Processpayment in your notify url so that it can catch the payment gateway response & convert it to a standard Status object. The notify url is where the Payment gateway sends its response.
//To TRIGGER PAYMENT PLUGIN
$dispatcher = JDispatcher::getInstance();
JPluginHelper::importPlugin('payment', $pg_plugin);  //$pg_plugin - name of plugin
//Trigger onTP_Processpayment() validate the payment response and return the payment detail.
$data = $dispatcher->trigger('onTP_Processpayment', array($post));  //$post - contain payment response
$data = $data[0];