
General
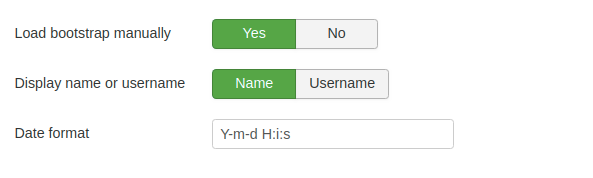
- Load bootstrap manually: If set to 'Yes', bootstrap css will be loaded from the Shika component on the user side.
- Display name or username: If set to 'Name', then Name will be shown on front else Username
- Date format : Date format to show everywhere on site except CSV import and other areas note that filters will not have a date format and date format can be set as per http://php.net/manual/en/function.date.php
Course Settings
Course Creation Settings
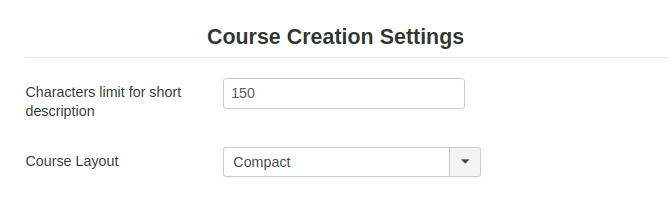
Characters limit for short description of create course
- Count of characters to be shown in the front end on the Course Card.
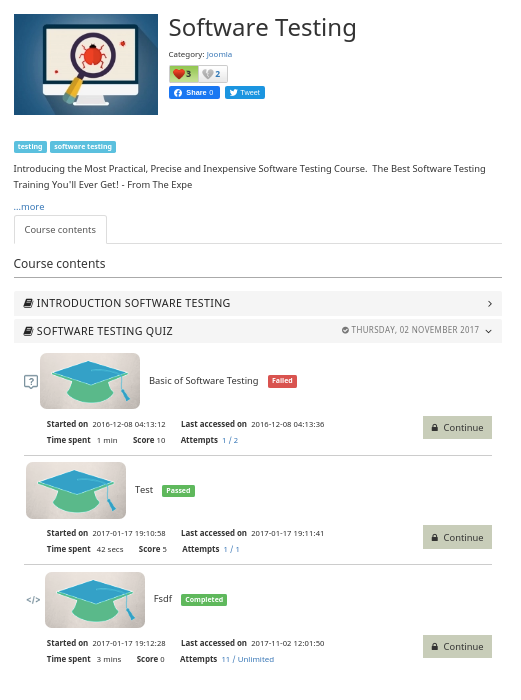
Course Layout
- Choose the layout to show the lessons in the selected layout.
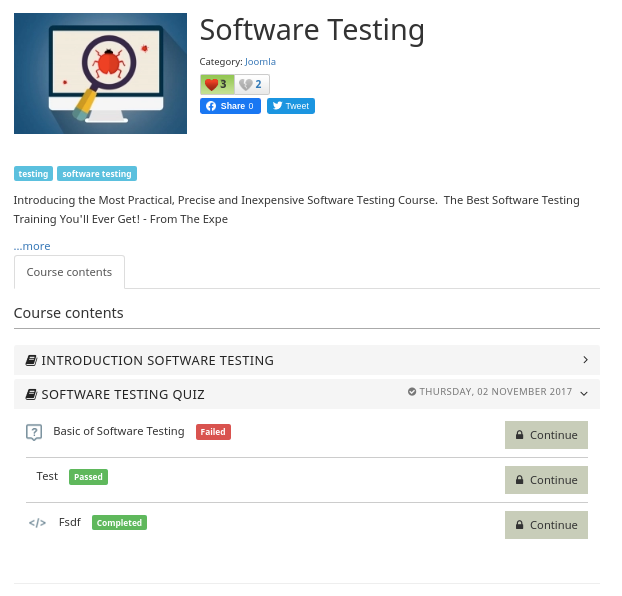
Compact Layout
- In compact layout very minimum information for the lessons are displayed i.e only lesson name and the “Continue” button is shown.
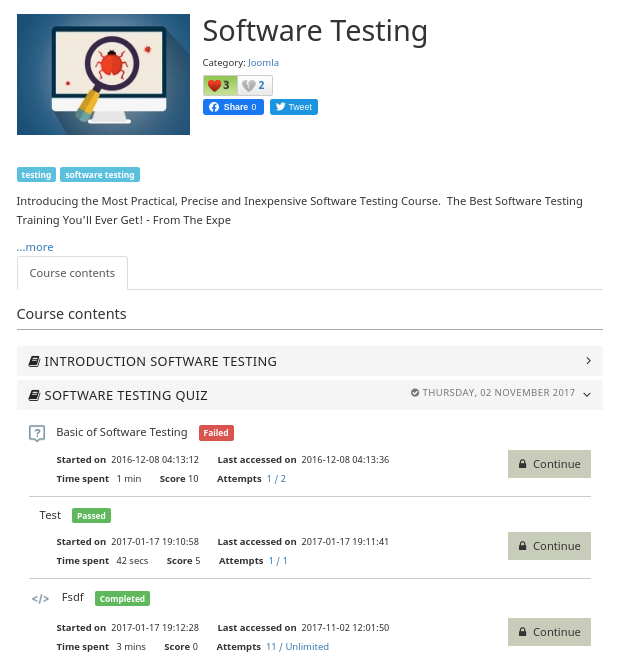
Legacy Layout
- In Legacy layout - is a layout in which details of the lesson are displayed like Start date, attempts, score etc.
Extended layout
- In extended layout along with the details of the lesson, lesson image is shown (which can be uploaded while creating the lesson).
Course Enrolment settings
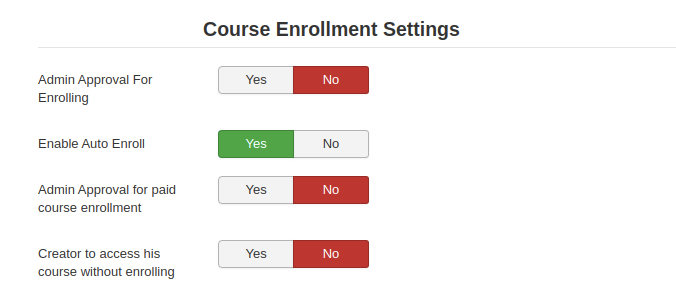
Admin Approval for Enrolling
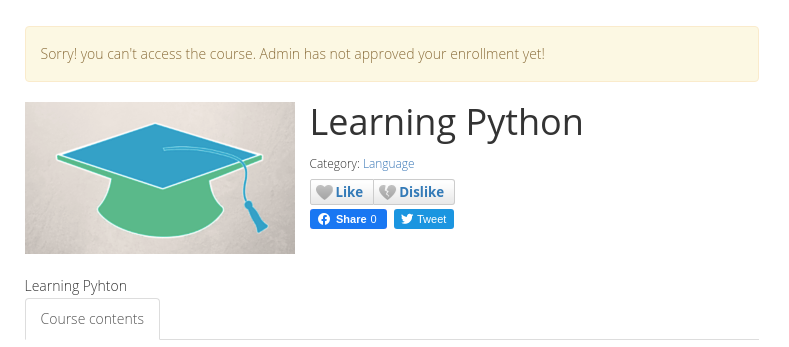
- This configuration gives an ability to the administrator to manage approval for the enrolment to courses. If this is set to “Yes”, then any user who enrols a course from the user side, the user will only be able to access the course material after the admin approves his enrolment. Below is the screenshot showing the message after user enrols to a course and admin approval is set to “Yes”.

Auto Enroll
- If set to 'Yes", Users/Students can get auto-enrolled in the background after clicking on the launch button and they do not need to enrol explicitly.
- Below are the scenarios
- The course is Public, User is Guest, In Permissions tab Enrol permission is allowed to Guests.
- In this case, the Guest can launch the lessons & no tracking will happen
- The course is Public, User is Logged in, In Permissions tab Enrol permission is allowed to Registered users.
- In this case, the user can launch the lessons & enrolment will happen behind the scenes & tracking will happen.
- The course is Public, Enrol User is guest, In Permissions tab enrol, is denied is given to Guests
- Guests can see the course TOC page. However, they cannot launch lessons
- Guest can't see the course at all
- Course is Registered
- In this case, the course can't be seen by guests but logged in users can enrol again with enrolment happening behind the scenes.
*This only applies to 'Non Quiz' lessons. Right now we still don't allow (and have never allowed Guest access to quizzes). However, we might consider this in the future.
- Admin Approval for paid course enrolment: This configuration gives an ability to the administrator to manage approval for the enrolment to Paid Courses. If this is set to “Yes”, then any user who purchases a course from the user side, the user will only be able to access the course material after the admin approves his enrollment. Below is the screenshot showing the message after the user purchased a course and admin approval is set to “Yes”.
- Creator can access the course directly without enrolling for a course: If set to 'Yes', the creator of the course can access the course without enrolling at the user side.
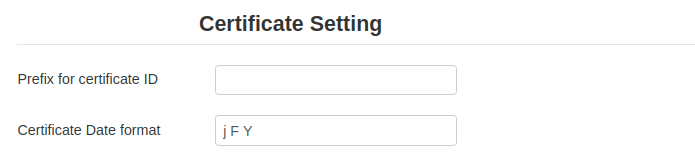
Certificate settings
Tags settings

- Enable Tags for courses: Allows course creators to add tags for a course. Note:- Not supported for Joomla 2.5. When this setting is set to “Yes”, while creating a course, an option will appear to add tags in the courses
Social media settings
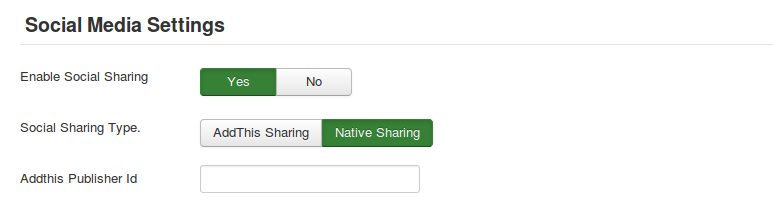
- Enable Social Sharing: If set to 'Yes', social sharing (Facebook, twitter) will be enabled on the course details page on the user side..
- Social Sharing Type: Choose the type for Social sharing. When “Native Sharing” is selected, Facebook and twitter sharing options will be displayed on the course details page.
- Addthis Publisher ID: Addthis publisher ID - not compulsory but needed for seeing analytics at Addthis.com. This can also be used for social sharing. To configure this you can visit https://www.addthis.com/ and there you will get the Publisher ID to do the necessary configurations.
Lesson Settings
Lesson Creation settings
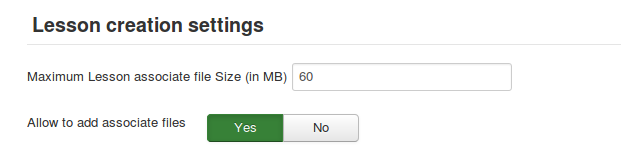
- Maximum Lesson associate file size (in MB): Max size (in MB) file can be uploaded for lesson format and associate files. Here admin can set the size till which lesson related files can be uploaded in the LMS. This will include Lesson format files like SCORM zip, HTML5 zip, documents(in case you’re using “PDFViewer”), Video files (in case you’re using JWPlayer) and also associate files which are added against a particular lesson.
- Allow to add associate files: If set to 'Yes', admin will be able to add associate files to the lesson while lesson creation.
Lesson Layout settings

Launch Lesson in
Same window
- If this option is selected, then while on launching a lesson, it will open in the same window (browser tab) from which the lesson is attempted to open.
Another window
- If this option is selected, then while on launching a lesson, it will open in the other window (new browser tab) from which the lesson is attempted to open.
Select toolbar position
- Select the position where you want to show the JLike toolbar.
Top
- If this option is selected, the toolbar will be displayed at the top of the lesson window. [See the image below]
Bottom
- If this option is selected, the toolbar will be displayed at the bottom of the lesson window. [See the image below]
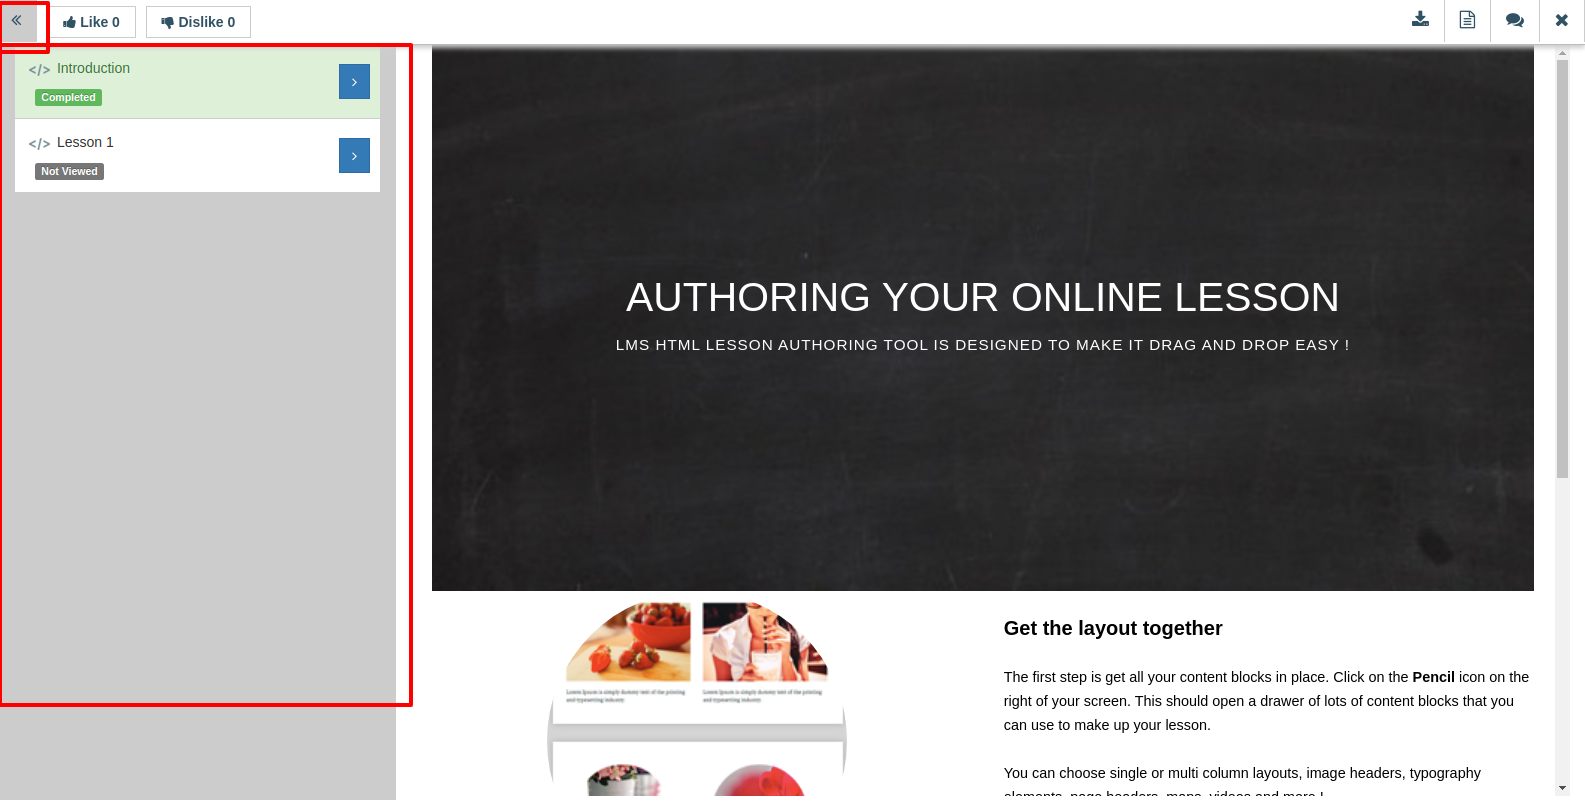
Show Lesson Playlist
- If set to 'Yes', the lesson playlist will display the Lesson Playlist. The playlist can be toggled using the “toggle” [<<] option available on the toolbar [See image below]. If this toggle option is set to is minimized then, it will remember your decision and for the next lessons the Playlist will be minimised, unless you toggle it to set it expand. The Lesson playlist shows all the further lessons available in the course and which can be directly accessed from the Lesson playlist without going back to the course details page.
Quiz Settings
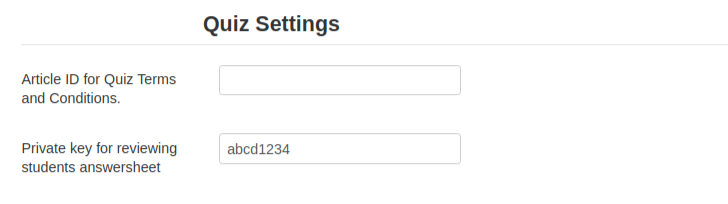
Article ID for Quiz Terms and Conditions:
- Terms and Conditions article ID is entered, will be shown to the users while taking the quiz.
Private key for reviewing student's answer sheet:
- This key will be use as a security key by which only the admin can view students answer-sheet
Social Integrations
Point system settings
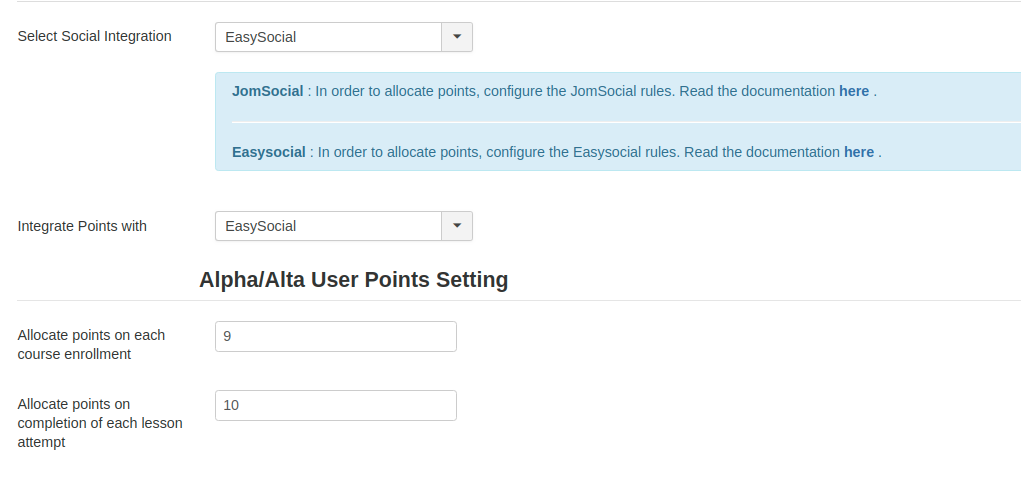
Select Social Integration
- Select the social networking extension to integrate with Shika within EasySocial, Jomsocial, etc.. If there is no social networking extension installed then select the option as Joomla.
Integrate Points with
- Select the point system that can be used for awarding student points for their activities.
- Allocate points on each course enrollment: Student will be allocated with points on each course enrolment (used for alphauser/altauser points only)
- Allocate points on completion of each lesson attempt: Student will be allocated with points on each lesson completion/passed (used for alphauser/altauser points only)
Activity stream settings
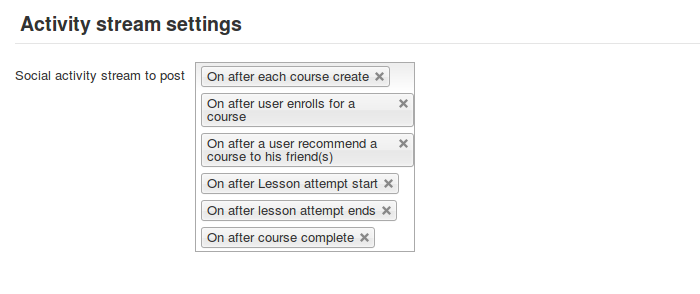
- Social activity stream to post: Only selected activity will be posted on social sites. This also applies to the Shika activity stream.
Image Settings
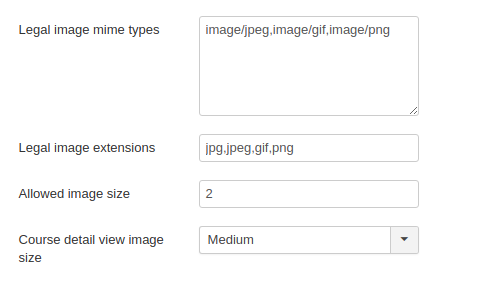
Legal Image mime types
This option is where you can add legal mime image types which are to be allowed for image upload.
Legal image extensions
This option is where you can add the allowed image extensions which you wish to be valid for any image file uploads.
Allowed image size
This option allows you to add a maximum size for an image which can be uploaded in the system.
Course detail view image size
This option allows you to select the image size to be shown on Course details view - Small, Medium or Large.
Image Path Settings
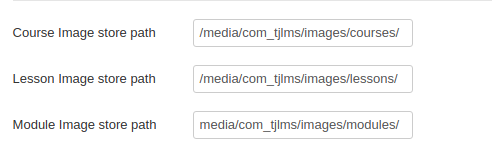
The resized images will be stored here.
Course Image store path
- This option is where you can specify the path where you want to store the course image.
Lesson Image store path
- This option is where you can specify the path where you want to store the course image.
Image resize settings
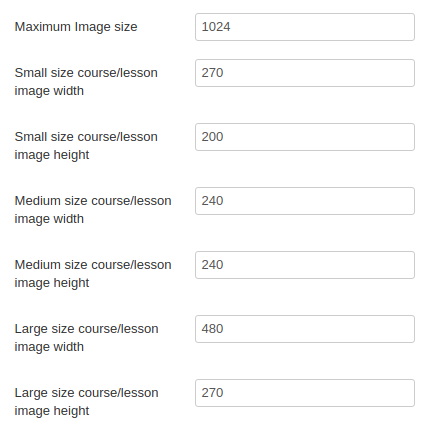
The max size of the image can be set here. Also, you can set the dimensions for the images which will be shown in different areas of the frontend.
- Maximum Image size: Maximum Image size in KB
- Small size course/lesson image width: Small size course/lesson image width in px
- Small size course/lesson image height: Small size course/lesson image height in px
- Medium size course/lesson image width: Medium size course/lesson image width in px
- Medium size course/lesson image height:Medium size course/lesson image height in px
- Large size course/lesson image width: Large size course/lesson image width in px
- Large size course/lesson image height: Large size course/lesson image height in px
Remote Storage Settings
Shika has the option of storing your data on the Amazon S3 cloud storage.
Amazon S3
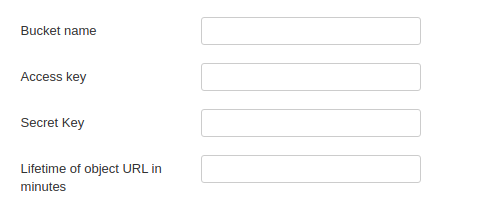
Set the bucket name, your Access Key & Secret Key here.
- Bucket name: Name of the bucket
- Access key: Your Amazon S3 access key
- Secret Key: Your Amazon S3 secret key
- Lifetime of object URL in minutes: This is the lifetime of the object (i.e course, lesson images, etc.) i.e for how much time it will be valid.
Storage Methods

Here, you can choose the storage locations of your Shika content. You can specify which content is to be stored on your local server and which is to be stored on Amazon S3.
Course image
- Location of course images. Here you can select the location i.e Local server or Amazon S3 for the course images.
Lesson format files
- Location of lesson format files. Here you can select the location i.e Local server or Amazon S3 for the lesson format files.
Lesson image files
- Location of lesson image. Here you can select the location i.e Local server or Amazon S3 for the lesson images.
Lesson associated files
- Location of lesson associated files. Here you can select the location i.e Local server or Amazon S3 for the lesson associated files.
Payment Settings
All the settings related to Payments are stored here.
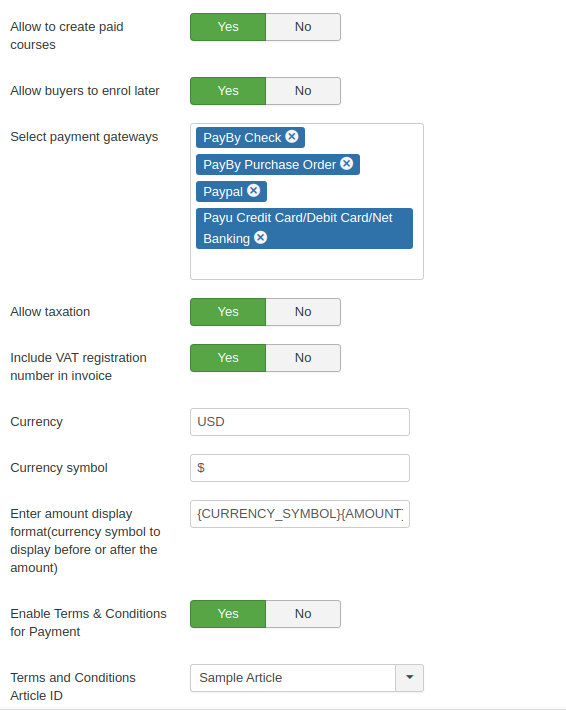
- Allow to create paid courses: If set to Yes, users will be able to create paid courses. While creating a course, a new tab will appear for “Course Pricing”, where subscriptions can be set up for the course with - Plan Name, duration, Price, etc.
- Allow Buyers to enrol later: If set to Yes, users will be able to enrol after purchasing the course. This option allows a facility to users to purchase courses and start their enrollment for the same on a later date.
- Select payment gateways: Selected payment gateways will be available to users. Shika comes with some default Payment gateways - like PayByCheque, ByByPurchaseOrder, Paypal, Authorise.net, 2Checkout, Stripe. All plugins listed on this link will also likely work. However, they are not covered under the support subscription. https://github.com/techjoomla/joomla-payments/tree/master/code/plugins
- Allow taxation: If set to Yes, tax will be applicable on purchase. For this, a “LMSTaxation” plugin should also be enabled where you can set the taxation %age to be applicable on purchase.
- Include VAT Registration Number in Invoice: Include VAT Registration Number in Customer Billing form
- Currency: Enter currency through which user can buy Courses like INR/ EUR/USD/GBP
- Currency symbol: Displays Currency Symbols instead of Currency code. NOTE: Enter Symbols in the same order as Codes, example if, Codes=USD then Symbols=$
- Enter display format for the amount (either display currency symbol before or after the amount): You can set currency, currency symbol display before or after amount e.g To display $ 100 use {CURRENCY_SYMBOL} {AMOUNT}
- Enable Terms & Conditions for Payment: If set to 'Yes', you can add your own Term and condition before making payment. And when this is set to “Yes”, then only an option will appear “terms and conditions Article ID” where you can add article ID for your Terms and conditions article which will be shown while the checkout process.
- Terms And Conditions Article ID: Provide the article ID which has the term and condition described.
Order ID Settings
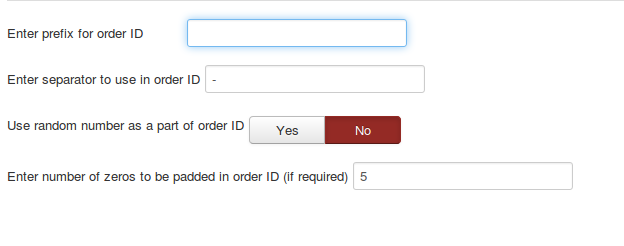
- Enter prefix for order ID: Enter prefix for order ID. This prefix will be added to the order ID when any order is placed and the order ID generated with the entered prefix.
- Enter separator to use in order ID: Enter separator to use in order ID e.g. _ or - or / . Order ID will look like JG_ISAVI_001
- Use random number as a part of order ID: Use random number as a part of order ID
- Enter number of zeros to be padded in order ID (if required): Enter number of zeros to be padded in order ID (if required)
Google Enhanced Ecommerce Tracking Settings
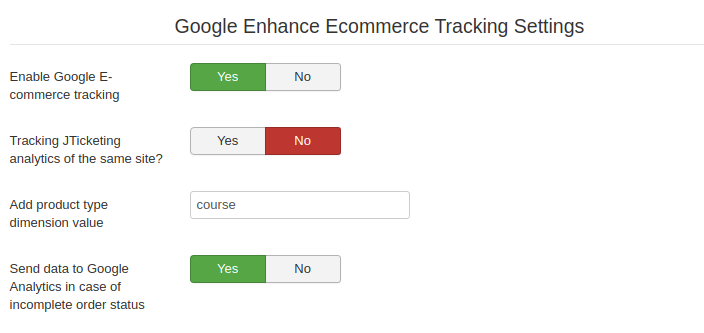
Enable Google Ecommerce tracking - This option allows you to switch ON/OFF the Ecommerce tracking via Google analytics. For this you need to configure a plugin “System - Google Universal Analytics + GTM, Matomo Analytics + TM" where Google Analytics Tracking ID to be configured in order to track the Ecommerce analytics.
Tracking JTicketing analytics of the same site - This option allows to track the JTicketing events ecommerce analytics if set to “Yes”.
Add product type dimension value - This is the option where you can add the product type. I.e for Shika - dimension type would be “course” as shown in the above example.
Send data to Google Analytics in case of incomplete order status - This option allows to share the data of incomplete transactions also with Google for tracking purposes.
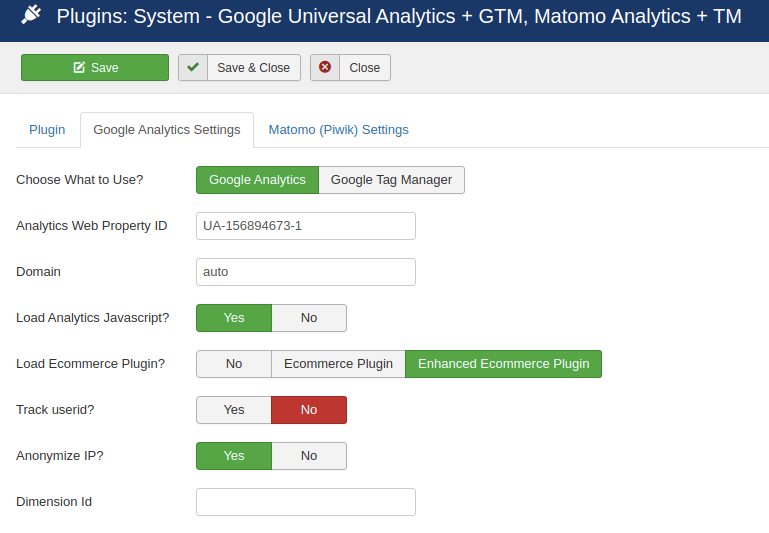
To setup & configure ecommerce tracking onGoogle Analytics - refer this link - https://docs.google.com/document/d/1xJLasNeyszTwU_Xkt3MHvLLx6tMbA-pHEPPKn39afDo/edit#heading=h.e6eu3xr68242
You will also be able to get the Tracking ID from the above link. Once you have the Tacking ID with you. You can go to Plugins and search for - “System - Google Universal Analytics + GTM, Matomo Analytics + TM“ and edit the plugin and follow the instructions given below -
- Go to “Google Analytics Settings”
- Enter the Tracking ID into “Analytics Web Property ID” and save the plugin.
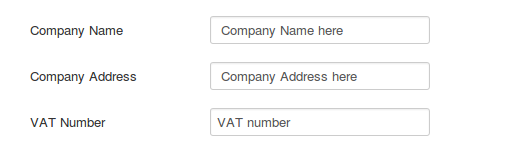
Company Details
You can enter your Company Details here.
These details are (if filled) then it will gets displayed on the course invoice after the check out process.
- Company Name: Name of the Company
- Company Address: Address of the Company
- VAT Number: VAT Number
Quiz Engine Settings

Media mime type
The mime types provided here are supported while uploading any media. Hence, the media types mentioned in this option will only be allowed to be uploaded and supported by Quiz type lessons.
Legal Extensions
These are the legal extensions which are allowed to be uploaded in quiz type lessons / questions.
Media Size
Maximum size of the files which are allowed to upload.
Legal Image Extensions
Legal image extensions which are allowed to be uploaded in a quiz type lesson i.e while creating any question or submitting any answers of file upload type.
Cron Settings
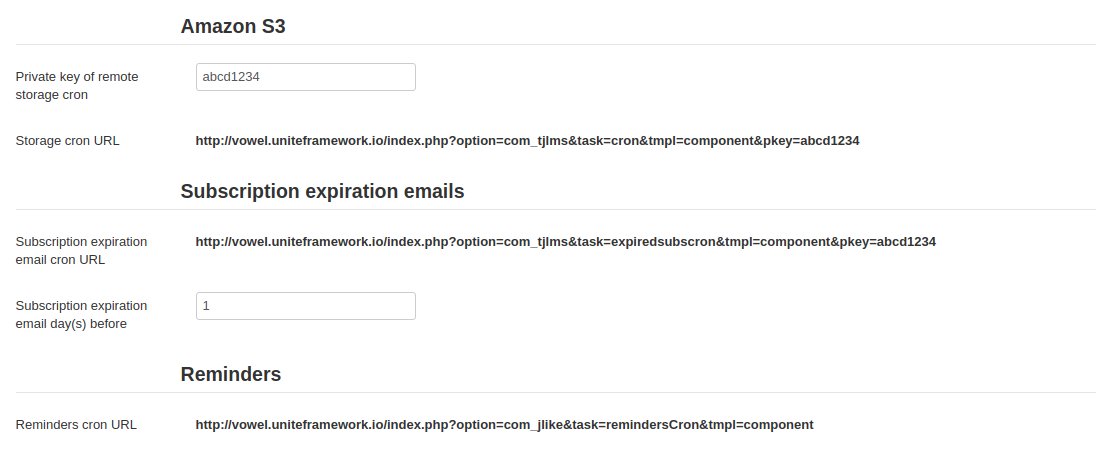
Amazon S3 Cron
After running Amazon S3 cron file media files will move to the Amazon S3 bucket configured in Amazon S3 settings.
- Private key of remote storage cron: The entered cron key will get appended to Storage cron URL, and this will be used to authenticate the URL
- Storage cron URL: Copy and paste this URL to move the training content to S3 from local and vice a versa
Subscription Expiry Emails Cron
The cron url if set or executed manually, it will send email notifications to the users for their course subscription expiry before the mentioned days in this cron.
Reminders Cron
The cron url if set or executed manually, it will send reminder email notifications to the users as the set duration in the Reminder templates.
Updates

- Download ID: Your Download ID to install the Shika extension directly. Download ID validates the user subscription and allows the system to get the updates related to Shika for new releases.
Permissions
Here the permissions can set so as to give the relevant permissions to the particular user group to access the desired content. The permissions available are -
- Manage All Training Materials - This permission is responsible for managing the course material. I.e adding / creating lessons in a course. If this permission is “Denied” to any group of users, the “Manage Training Materials” option would be disabled for the users belonging to this group. [See the image below]

- View Categories - This permission is responsible for displaying the “Course Categories” menu option on the left side bar. [See the image below]. If this permission is “Denied” to any group of users, the “Course Categories” option won’t show for the users belonging to this group.
- View Question Categories - This permission is responsible for displaying the “Question Categories” menu option on the left side bar. [See the image below]. If this permission is “Denied” to any group of users, the “Question Categories” option won’t show for the users belonging to this group.
- Manage All Questions - This permission is responsible for displaying and managing questions created by self or by any other user. If this permission is “Denied” to any group of users, to the users belonging to this group, the “Question Bank” view won’t show any questions which are created by other users. Provided, the ‘Manage Own Question” permission is allowed.
- Manage Own Questions - This permission is responsible for displaying and managing questions created by self. If this permission is “Denied” to any group of users, to the users belonging to this group, the “Question Bank” menu won’t show to them.
NOTE: In case both “Manage All Questions” and “Manage Own Questions” permission is denied to any group of users, “Question Bank” menu won’t show up to those users. Even if Only “Manage All Questions” permission is Allowed and “Manage Own Questions” permission is “Denied” in this case also, the “Question Bank” menu won’t show up. Reverse would work.
- Manage All Enrollments - This permission is responsible for allowing manage enrolments to all the courses either created by self or any other admin user. If this permission is “Denied” to any group of users, to the users belonging to this group, the “Manage Enrolment” menu won’t show up to them.
- Manage Own Course Enrollments - This permission is responsible for allowing manage enrolments to self created courses only i.e the courses created by logged in users. If this permission is “Denied” to any group of users, the “Enrol/Assign” users option on courses list view would be disabled.
- View Certificate Template - This permission is responsible for displaying the “Certificate Templates” menu option on the left side bar. [See the image below]. If this permission is “Denied” to any group of users, the “Certificate Templates” menu option won’t show for the users belonging to this group.
- Create Coupons - This permission is responsible for creation access for the coupons. If this permission is “Denied” to any group of users, the users belonging to this group won’t be able to create coupons.
- View Coupons - This permission is responsible for displaying the “Coupons” menu option on the left sidebar and its contents. [See the image below]. If this permission is “Denied” to any group of users, the “Coupons” menu option won’t show for the users belonging to this group.
- View Reminders - This permission is responsible for displaying the “Reminders” menu option on the left sidebar and its contents. [See the image below]. If this permission is “Denied” to any group of users, the “Reminders” menu option won’t show for the users belonging to this group.
- View Orders - This permission is responsible for displaying the “Orders” menu option on the left sidebar and its contents. [See the image below]. If this permission is “Denied” to any group of users, the “Orders” menu option won’t show for the users belonging to this group.
- View Activities - This permission is responsible for displaying the “Activities” menu option on the left sidebar and its contents. [See the image below]. If this permission is “Denied” to any group of users, the “Activities” menu option won’t show for the users belonging to this group.
- View Reports - This permission is responsible for displaying the “Reports” menu option on the left sidebar and its contents. [See the image below]. If this permission is “Denied” to any group of users, the “Reports” menu option won’t show for the users belonging to this group.
- Enroll - This permission is responsible for displaying the “Enrol” button to the users on the user side. If this permission is “Denied” to any group of users, the “Enrol” option won’t show for the users belonging to this group on the course details page.
- Assessment - This option is responsible for accessing the assessment view on the user side. If this permission is “Denied” to any group of users, the “Assessment” menu won;t be accessible to the users belonging to this group.
- Edit Own Assessment - This option is responsible for editing own submissions (already assessed) on the user side. If this permission is “Denied” to any group of users, the users belonging to this group won’t be able to edit their own submissions.
- Edit All Assessment - This option is responsible for editing all submissions (already assessed) on the user side. If this permission is “Denied” to any group of users, the users belonging to this group won’t be able to edit the submissions which are already assessed.