The Techjoomla Blog
Clone html element using jquery
Hello!
Guys, This blog is about adding multiple html elements using jQuery and display the cloned field. If you are a developer, you might be interested in this. Hope this Helps! :)
So this is Quick guide to create multiple fields as many as with in minimum efforts
Lets' code! Step by step :
A. Add jQuery file from Google API and add required styling-
<html>
  <head>
      <script src="http://ajax.googleapis.com/ajax/libs/jquery/1.7.2/jquery.min.js"></script>
      <style>
           .qtc_att_hide {display: none;}
      </style>
  </head>
B: Lets create template HTML code which you have to create for N times. -
Lets say template html is for text box field and you have to add for N time. Each time while adding the new field via. javascript, we are using this template code to generate the new field. As this is the template will not be shown to user, so we can hide it with the help of class styling qtc_att_hide.
<!--Create one div and hide it. It will act as template for cloning-->
<div id=<?php echo $attribute_container_id ?> class="qtc_container qtc_att_hide" style="" >
	<div class="com_qtc_repeating_block well well-small span10">
		<label class="" ><strong>Add Extra Attribute </strong></label>

                 <!-- Lets take a take a text box field to clone -->
		<input id="atrri_name0" name="atrri_name0" class="input-medium attriFieldClass" type="text" value="" maxlength="250" size="32">
	</div>
	<!-- required -->
	<div></div>
</div>
C: Display saved fields and add one more extra fields -
Following code sample displays already saved fields details along with delete button. Also adds one more extra field with blank details so that user can add one more field easily.
<?php
// $allAttribues contains previously stored field details
$i=1;
$count = !empty($allAttribues)?count($allAttribues):1;

// For each attribute and one extra field
for ($i = 1;$i <= $count;$i++)
{
	$attribute_container_id = "qtc_container".$i;
?>
	<div id=<?php echo $attribute_container_id ?> class="qtc_container">

		<div class="com_qtc_repeating_block well well-small span10">
			<label class="" ><strong>Add Extra Attribute </strong></label>
			<input id="atrri_name<?php echo $i; ?>" name="atrri_name<?php echo $i; ?>" class="input-medium attriFieldClass" type="text" value="<?php echo (isset($allAttribues[$i]->itemattribute_name))?$allAttribues[$i]->itemattribute_name:''; ?>" maxlength="250" size="32">
		</div>

		<!-- Here is remove button for each field -->
		<div class='com_qtc_remove_button pull-left span1'>
			<button class='btn btn-mini' type='button' id='remove<?php echo $i;?>'
				onclick="removeClone('qtc_container<?php echo $i;?>','qtc_container');"                                               title="Remove Field" >
				<i class="icon-minus-2 "></i>
			</button>
		</div>
		<!-- required -->
		<div></div>
	</div>
<?php
}
?>
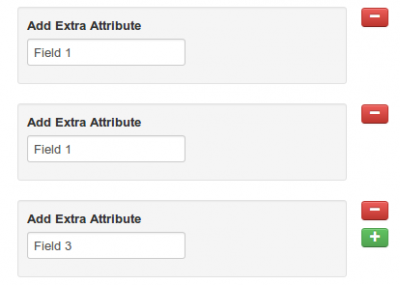
This will look like

D: Add "+" button for add more field functionality
<div class="com_qtc_add_button pull-left  span1">
	<button class="btn btn-mini " type="button" id='add' onclick="addClone('qtc_container','qtc_container');"             title="Add New Field">
		<i class="icon-plus-2 "></i>
	</button>
</div>
E: Finally following JavaScript code will be executed on add more and delete button.
<script type="text/javascript">

	// globle params
	var attribute_current_id = <?php echo $count; ?>;
	/**
	F: Finally add more fields using javascript.

	Following function makes a copy of template HTML and appends to the existing fields with the help of function parameters.
	*/
	function addClone(rId,rClass)
	{
		// CURRENT ATRIBURE ID -- global declaration
		attribute_current_id++;
		var num=attribute_current_id;

		// Make a clone from template div
		var newElem=jQuery('#'+rId+'0').clone().attr('id',rId+num);

		// Remove hidden styling
		newElem.removeClass('qtc_att_hide');

		// Add clone element at the end of other div
		jQuery('.'+rClass+':last').after(newElem);

		// CREATE REMOVE BUTTON
		var removeButton="<div class='com_qtc_remove_button pull-left span1'>";
		removeButton+="<button class='btn btn-mini' type='button' id='remove"+num+"'";
		removeButton+="onclick=\"removeClone('"+rId+num+"','"+rClass+"');\"  title=\"Remove Field\">";
		removeButton+="<i class=\"icon-minus-2\"></i></button>";
		removeButton+="</div>";

		jQuery('#'+rId+num).children().last().replaceWith(removeButton);

		var newelementid=	rId+num;
		var option=0;

		/*1. CHANGE ATTUBURE NAME */
		var newname='arri_name'+num;
		var ck=newElem.find('.attriFieldClass').attr({'name': newname,'id':newname});
	}

	/** G:This function remove the specified div */
	function removeClone(rId,rClass)
	{
		jQuery('#'+rId).remove();
	}
</script>
After cloning, fields will look as follow.

Follow the link to download this example CloningExample_20140613-125955_1.zip
When you subscribe to the blog, we will send you an e-mail when there are new updates on the site so you wouldn't miss them.
